Third-party single sign-on
Third-party single sign-on
Single sign-on client id
client ID
Single sign-on client secrets
secrets ID
matters needing attention
Remember to write and save the background parameters of AList. After writing and saving, you have to go back to the bottom of the personal data and there will be a button that needs to be bound, otherwise it cannot be used
Only one of the four types of single sign-on can be enabled temporarily. If you used other single sign-on methods before and then changed to a new single Unbind (just one click) and then bind the single sign-on method you want to use now.
If you use
GitHub,Microsoft,Google,DingTalk, you only need to fill in the client ID and secret key, and select the corresponding platform in the options.- If you use
Casdoorthe following parameters need to be filled in, just follow the tutorial to fill in
- If you use
Registration binding single sign-on
Warning
If you want to use GitHub to log in, you first need the machine you built Alist to be able to connect to GitHub before you can call and use it, otherwise you cannot use it if the link is not connected
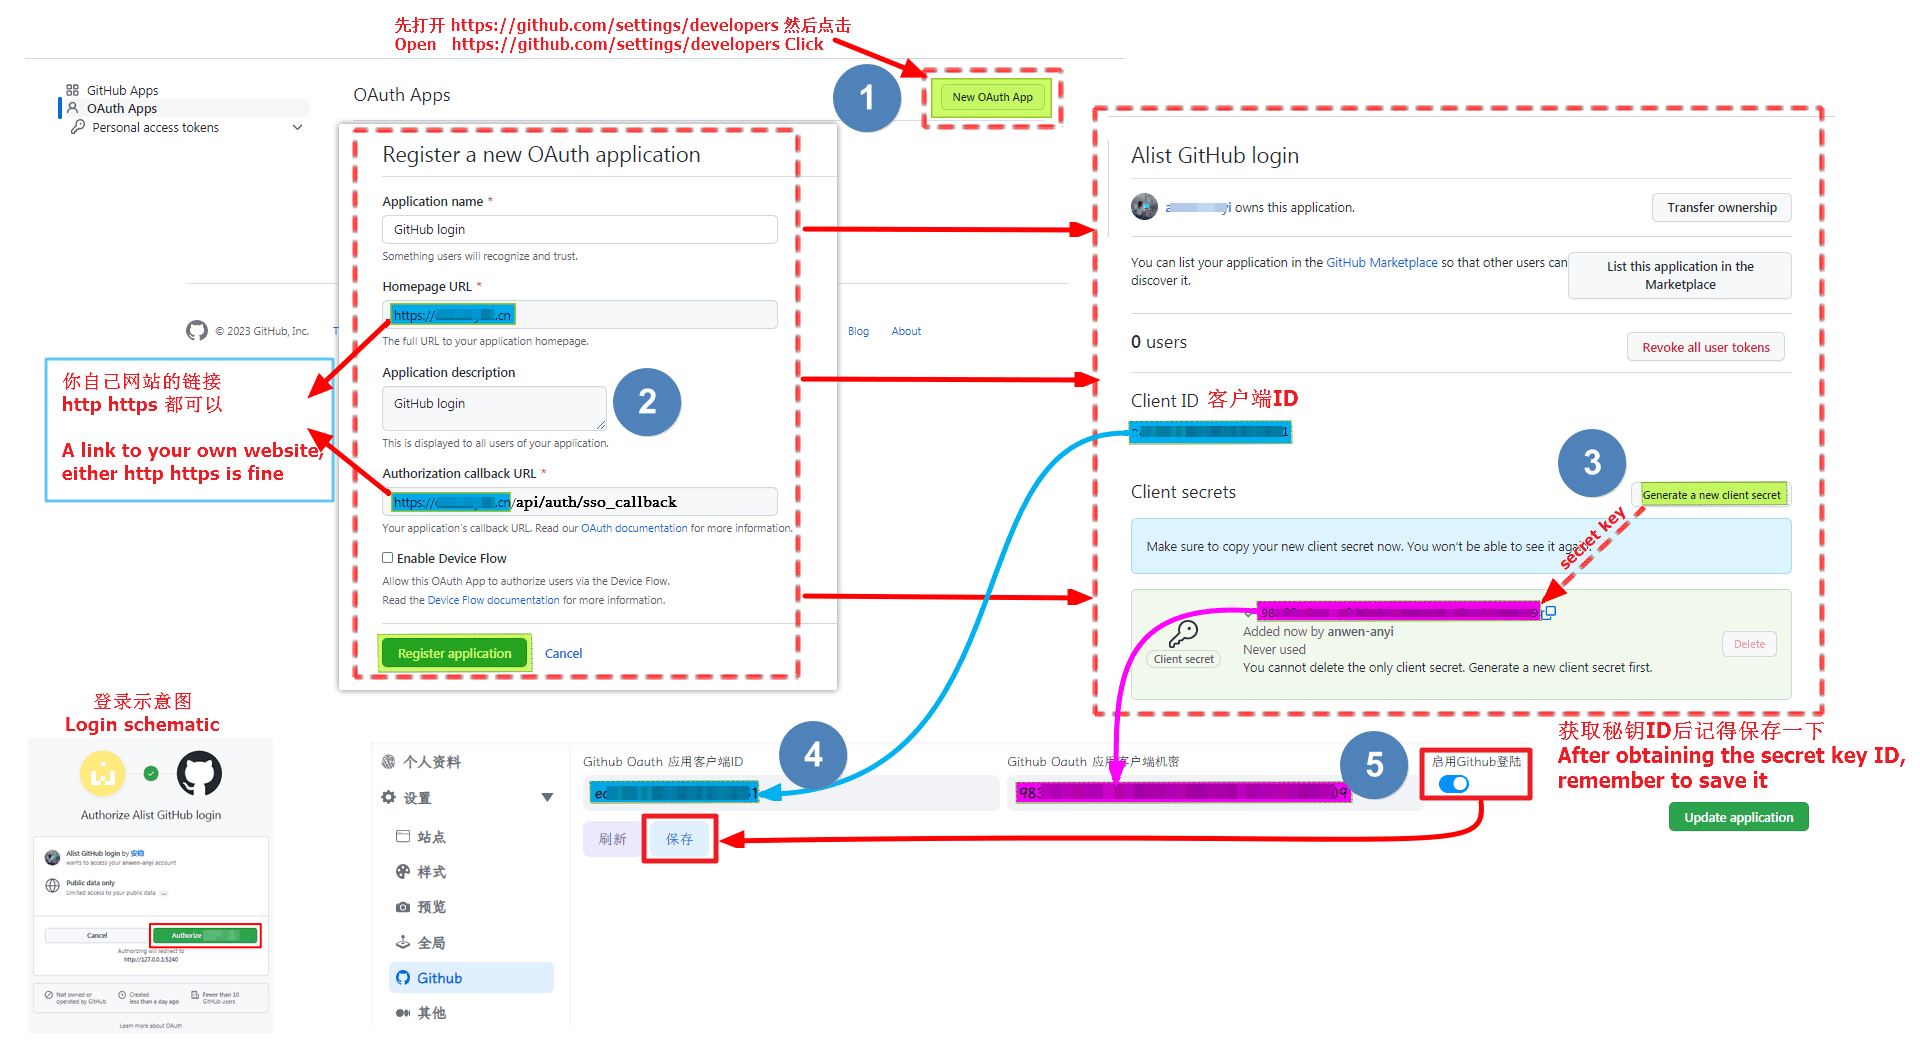
Open https://github.com/settings/developers Click New OAuth App
Register OAuth Instructions
- Application name
- Write whatever you want to call it
- Homepage URL
- home URL address
- Both http and https can be used
- home URL address
- Application description
- write whatever you want
- Authorization callback URL
- Callback URL address
- https://your_domain/api/auth/sso_callback
- Both http and https can be used
Remember to get Client secrets after filling it out, and then fill it in the Alist background.
Remember to write and save the background parameters of AList. After writing and saving, you have to go back to the bottom of the personal data and there will be a button that needs to be bound, otherwise it cannot be used
Completely fill in the reference schematic
GitHub login Video Tutorials
If the video fails, you can watch it here: https://b23.tv/Fm8AkC5
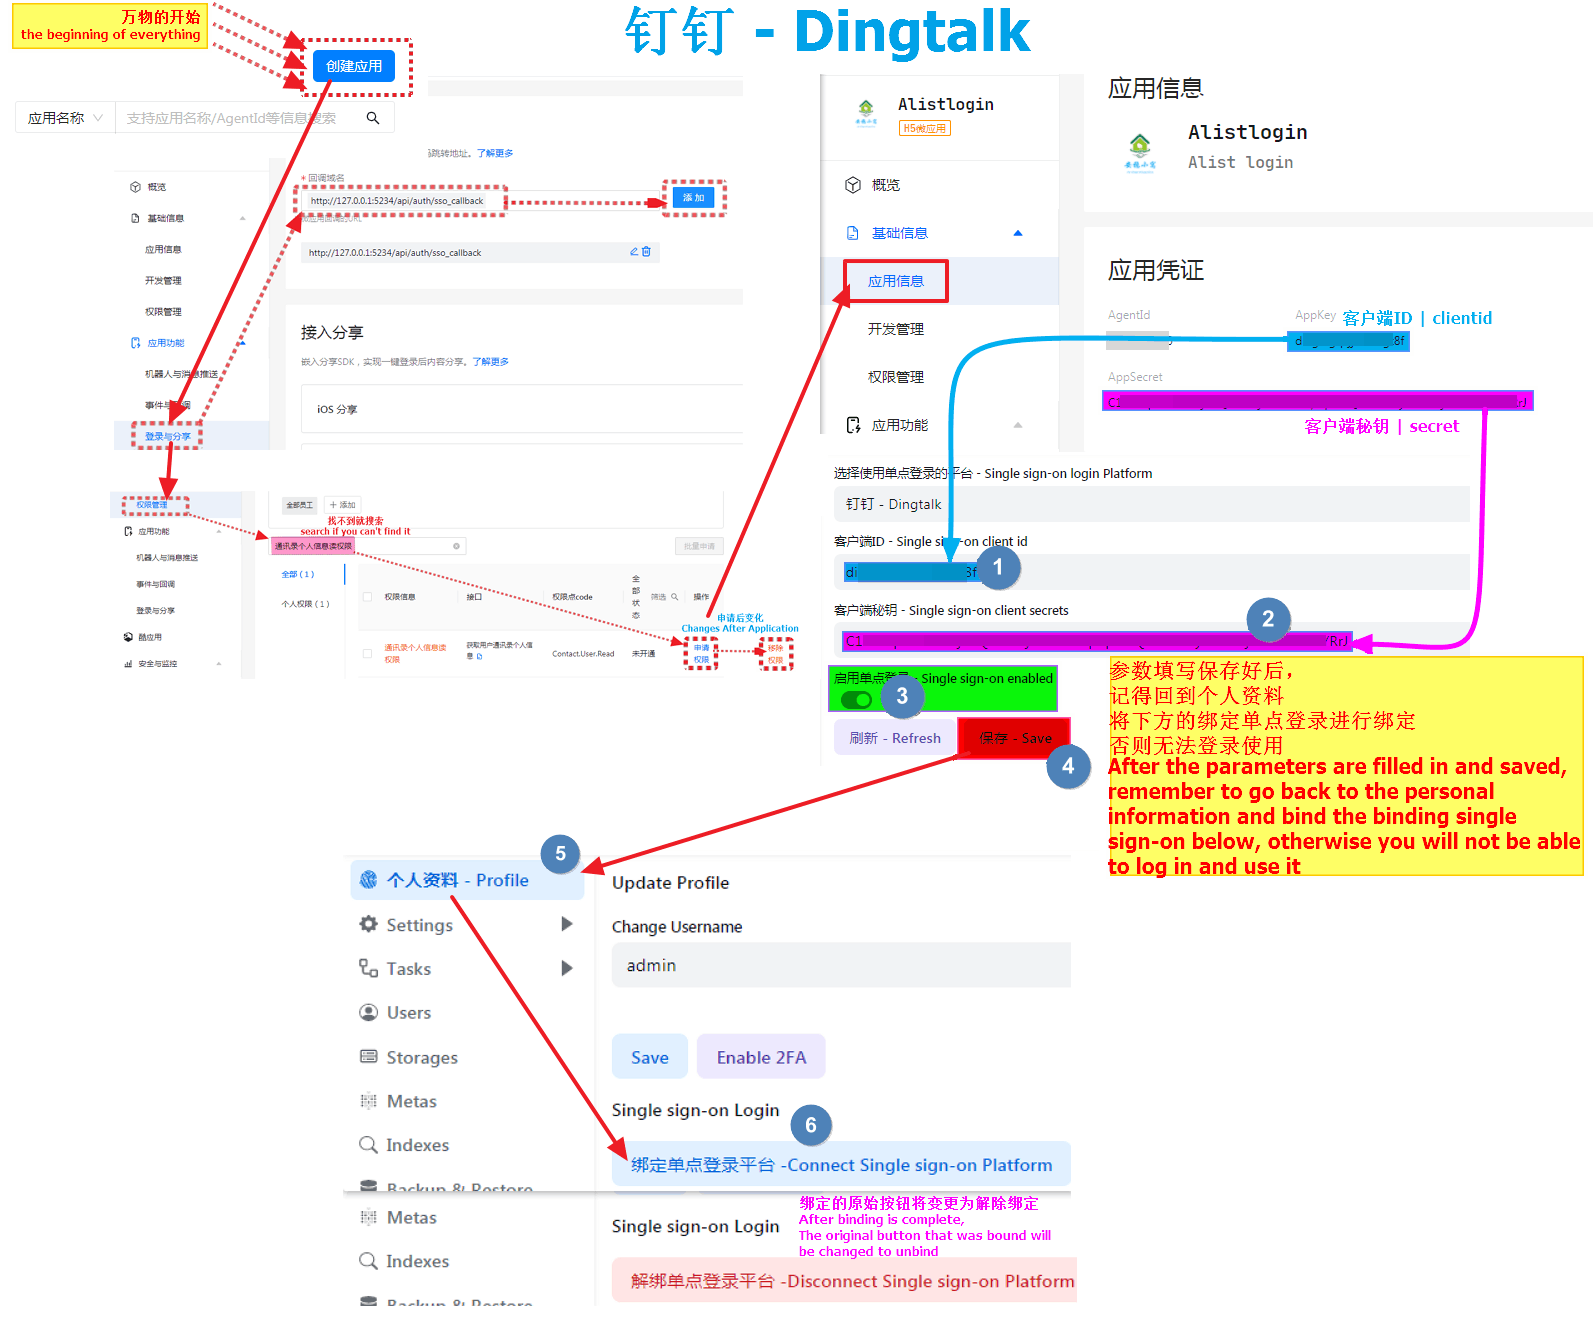
First open https://open-dev.dingtalk.com/fe/app#/corp/app
In the upper right corner, first select New Application, select H5 Micro Application as the type, fill in the content by yourself and click Confirm to create
Click on the new application and we will see the application credentials option, where AppKey is the client ID, and AppSecret is the client secret key
- Just fill in the corresponding parameters in the Alist background single sign-on
Go to the left column and find Login and Share Fill in the callback parameters http://127.0.0.1:5234/api/auth/sso_callback
http://127.0.0.1:5244/api/auth/sso_callback- Note: I used the callback parameter here for local testing. http://127.x When you use it, Write http(s)://your own domain name/api/auth/sso_callback when filling in and using it by yourself
Write the callback parameters well. Let’s go to the left column and find Privilege Management, find Personal Information Read Permission of Address Book and click to authorize
Remember to write and save the background parameters of AList. After writing and saving, you have to go back to the bottom of the personal data and there will be a button that needs to be bound, otherwise it cannot be used
Completely fill in the reference schematic
First open https://portal.azure.com/#view/Microsoft_AAD_RegisteredApps/ApplicationsListBlade
Then register to create an application, I won't say much here, you can see the complete schematic diagram
Account type must be selected: Account in any organizational directory (any Azure AD directory - multi-tenant)
Microsoft callback parameters: must start with "HTTPS" or "http://localhost (I used localhost here for local testing)
http://localhost:5244/api/auth/sso_callback?method=sso_get_token
http://localhost:5244/api/auth/sso_callback?method=get_sso_id- Write http(s)://your own domain name/api/auth/sso_callback?method=sso_get_token when filling in and using it by yourself
- Write http(s)://your own domain name/api/auth/sso_callback?method=get_sso_id when filling in and using it by yourself
- Note: When adding a redirect URL to a new application, only one can be added. After the application is registered and registered, click on the application to see the options behind the redirect URI
After filling it out, we click Certificate and Password on the left column to create a new Client Password to get our client secret key
- After the client password is created, the
valueparameter is ourclient key, remember to save it, it will not appear again if it appears once, if you don’t save it in time, just create a new client password
The client ID is in Overview at the top of the left column, find the application (client) ID, which is the client ID we need to fill in the Alist
- We have got the client ID and secret key and fill them in the AList single sign-on configuration.
Remember to write and save the background parameters of AList. After writing and saving, you have to go back to the bottom of the personal data and there will be a button that needs to be bound, otherwise it cannot be used
Completely fill in the reference schematic

Warning
If you want to use Google to log in, you first need the machine you built Alist to be able to connect to Google before you can call and use it, otherwise you cannot use it if the link is not connected
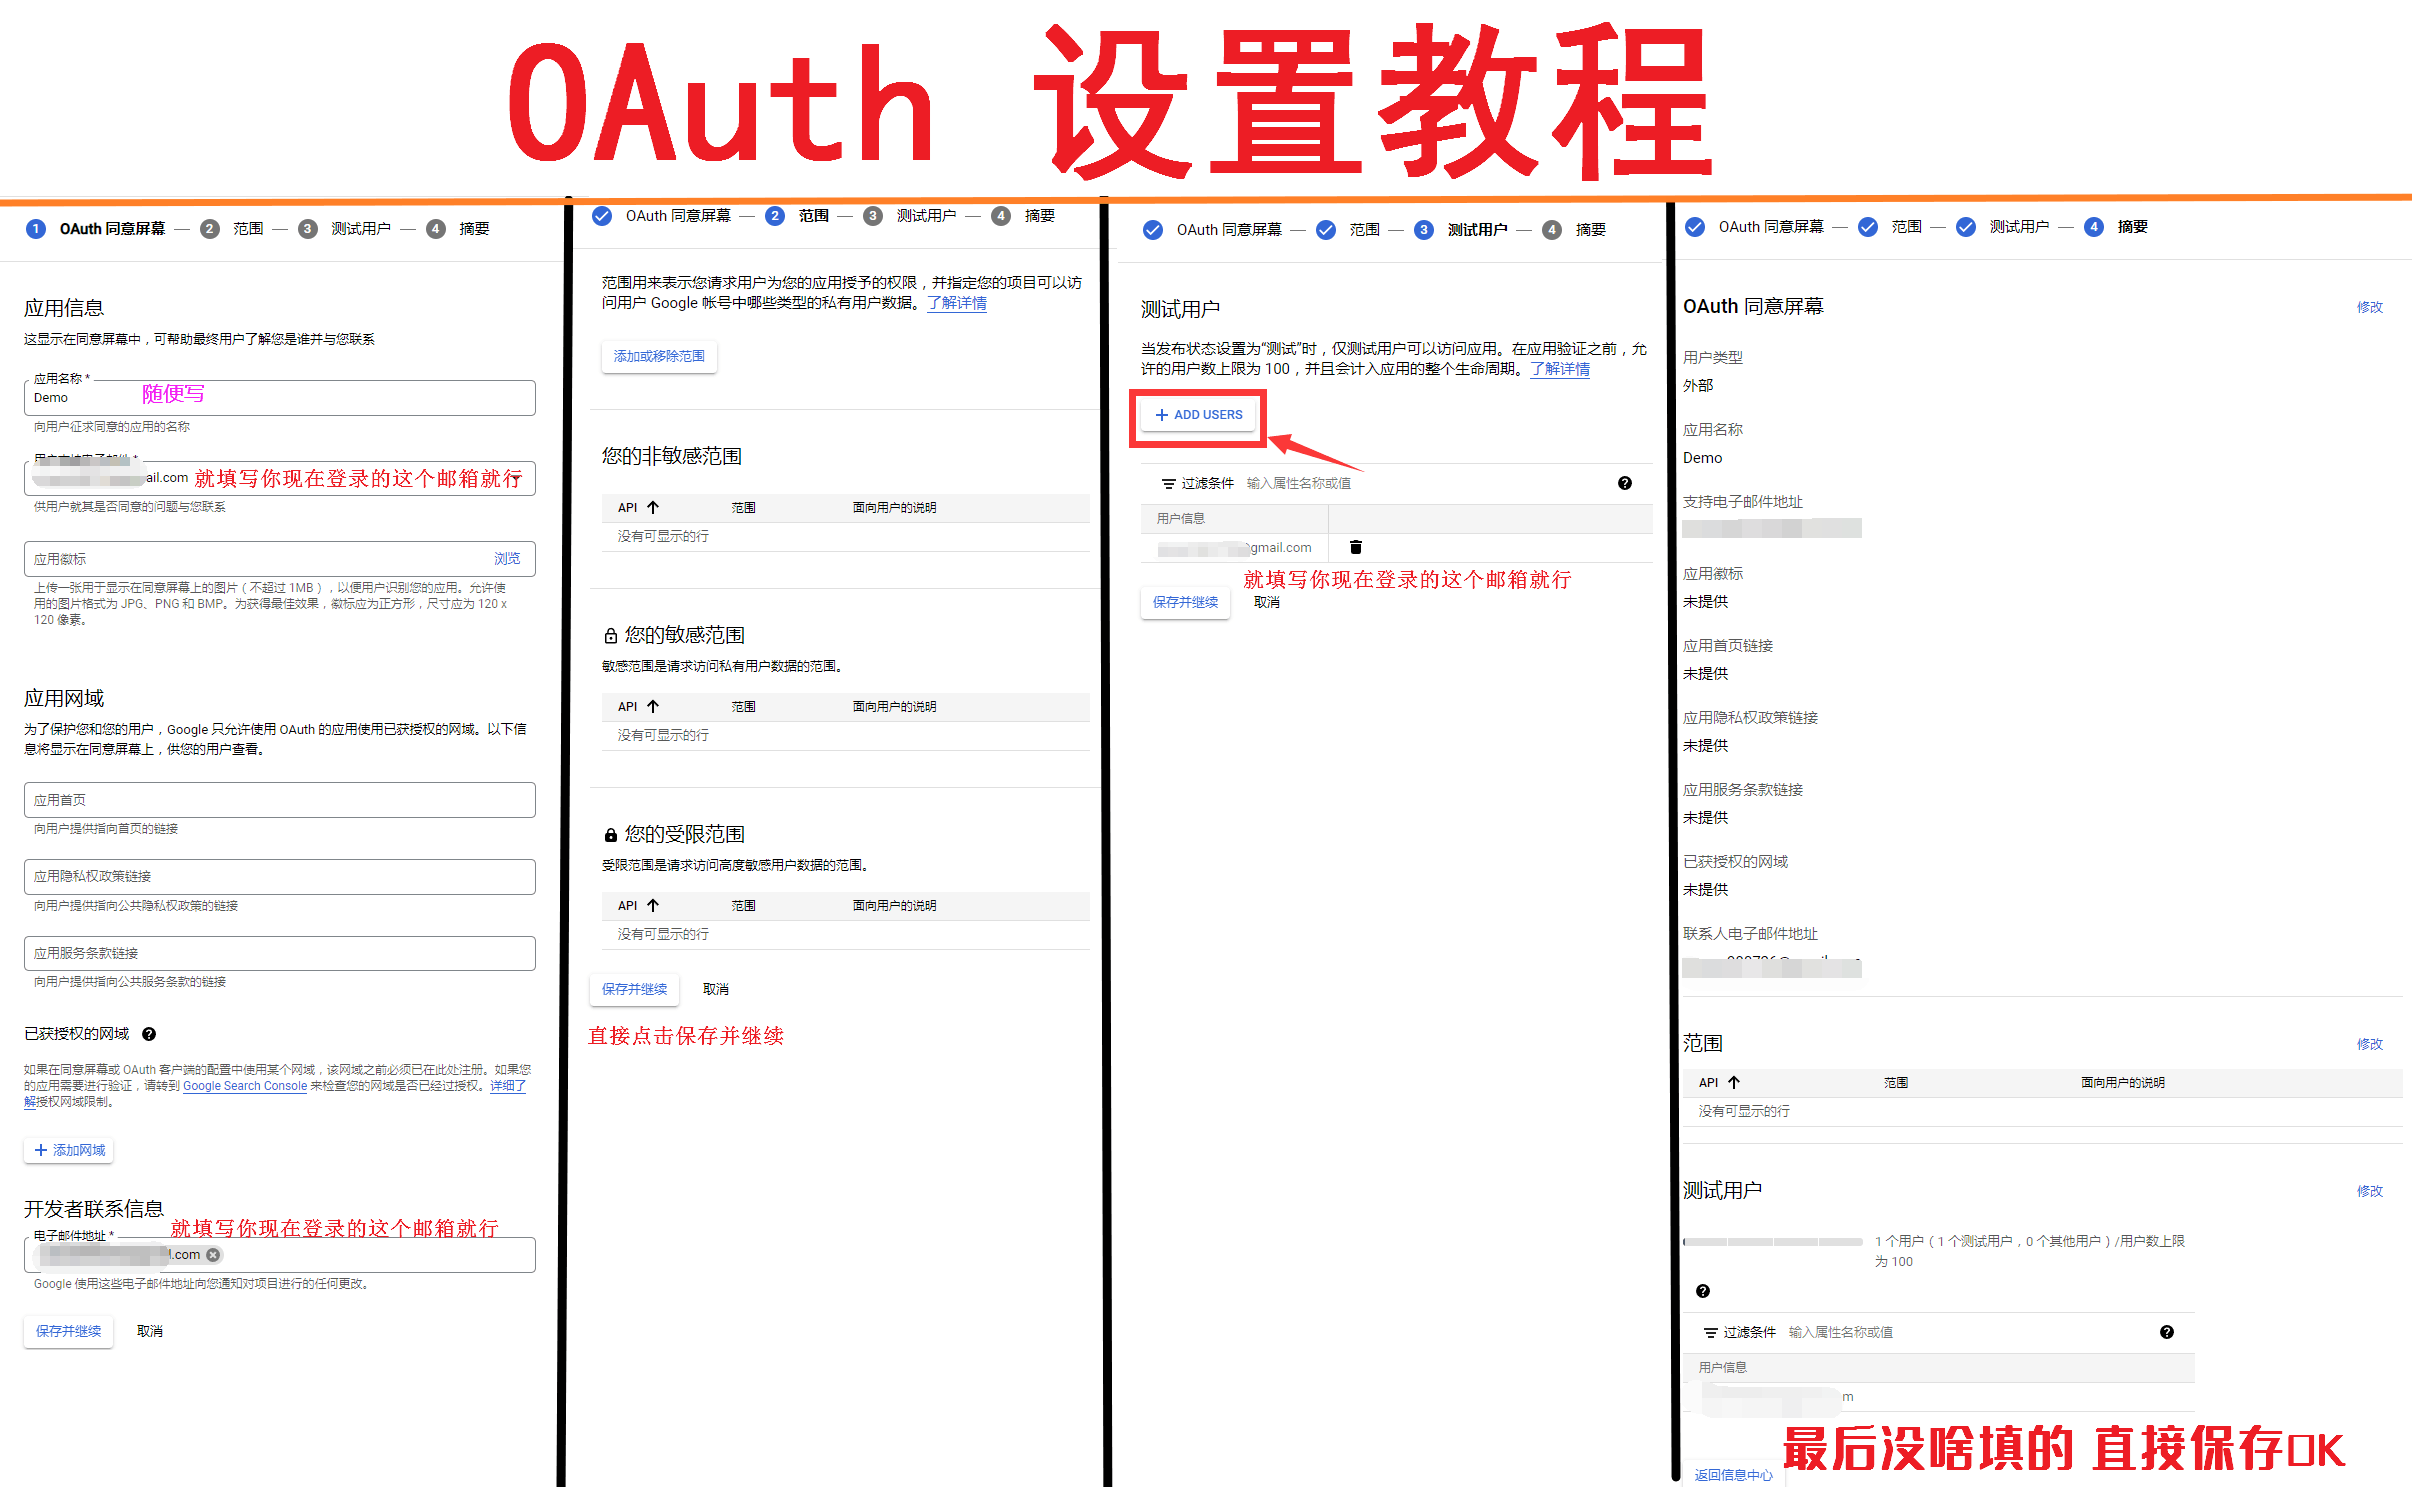
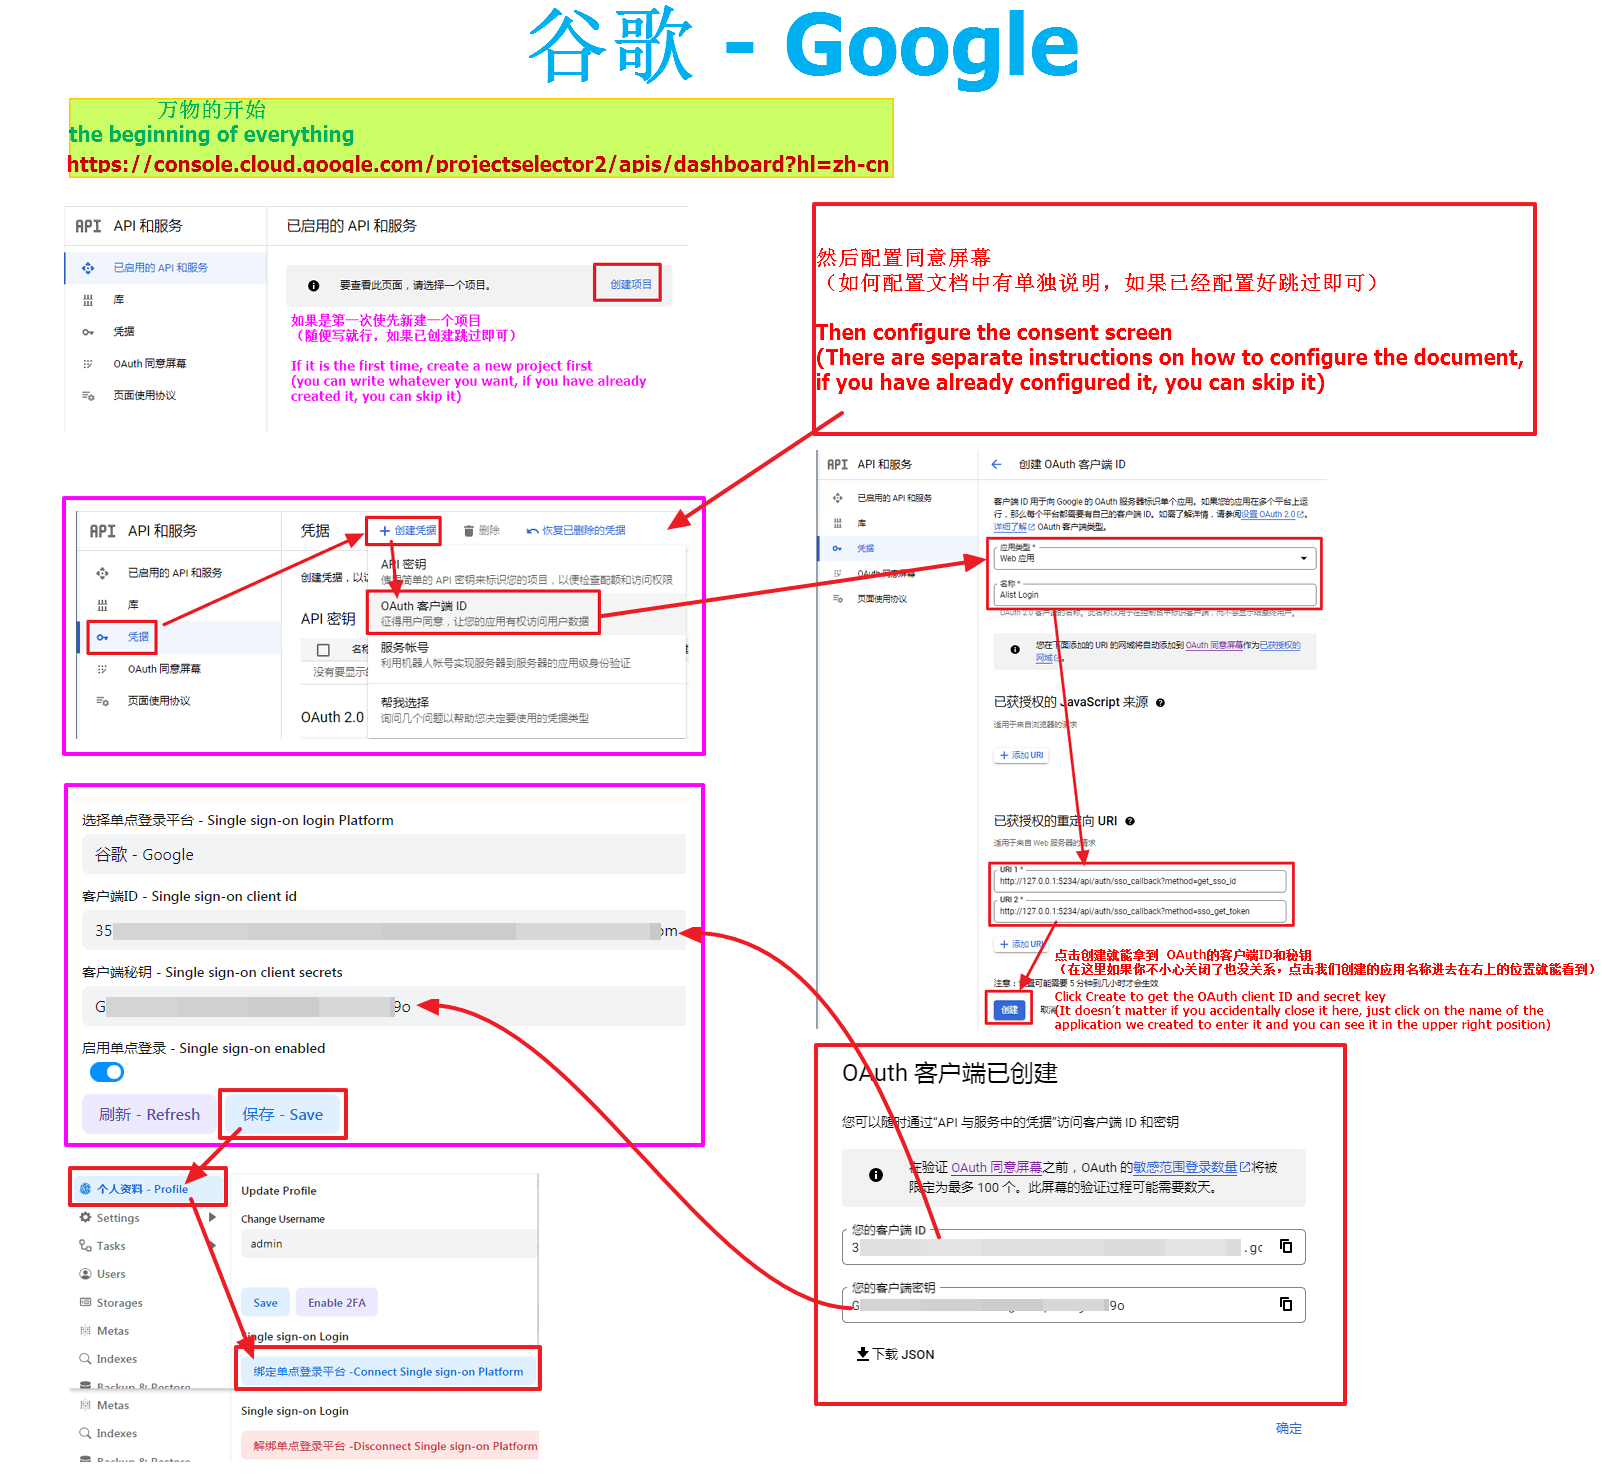
First open https://console.cloud.google.com/projectselector2/apis/dashboard?hl=zh-cn
If you are using it for the first time, you need to create a new project first (just write whatever you want, skip it if it has already been created)
Then configure the consent screen (there is a separate instruction on how to configure the document, if it is already configured, skip it)
After configuring the unified screen, we click the credentials on the left, create credentials, and select OAuth client ID
- Application Type Select Web Application, and write the name as you like
- Then add our two callback parameters in the authorized redirect URI
http://127.0.0.1:5244/api/auth/sso_callback?method=get_sso_id
http://127.0.0.1:5244/api/auth/sso_callback?method=sso_get_token- Write http(s)://your own domain name/api/auth/sso_callback?method=get_sso_id when filling in and using it by yourself
- Write http(s)://your own domain name/api/auth/sso_callback?method=sso_get_token when filling in and using it by yourself
After filling it out, click Create to get the OAuth client ID and secret key
- (It doesn't matter if you accidentally close it here, just click on the name of the application we created and enter it in the upper right position to see it)
We have got the client ID and secret key and fill them in the AList single sign-on configuration.
Remember to write and save the background parameters of AList. After writing and saving, you have to go back to the bottom of the personal data and there will be a button that needs to be bound, otherwise it cannot be used
Agree to screen configuration
If it has been configured, just ignore this picture (you can zoom in if you can’t see it clearly)
Completely fill in the reference schematic
What is Casdoor? Yes, you can use other OAuth applications to log in. Self-deployment is open source and free, and official hosting requires payment.
Now, Casdoor supports many OAuth application providers, as many as dozens of kinds, you have seen and not seen
GitHub open source link: https://github.com/casdoor/casdoor
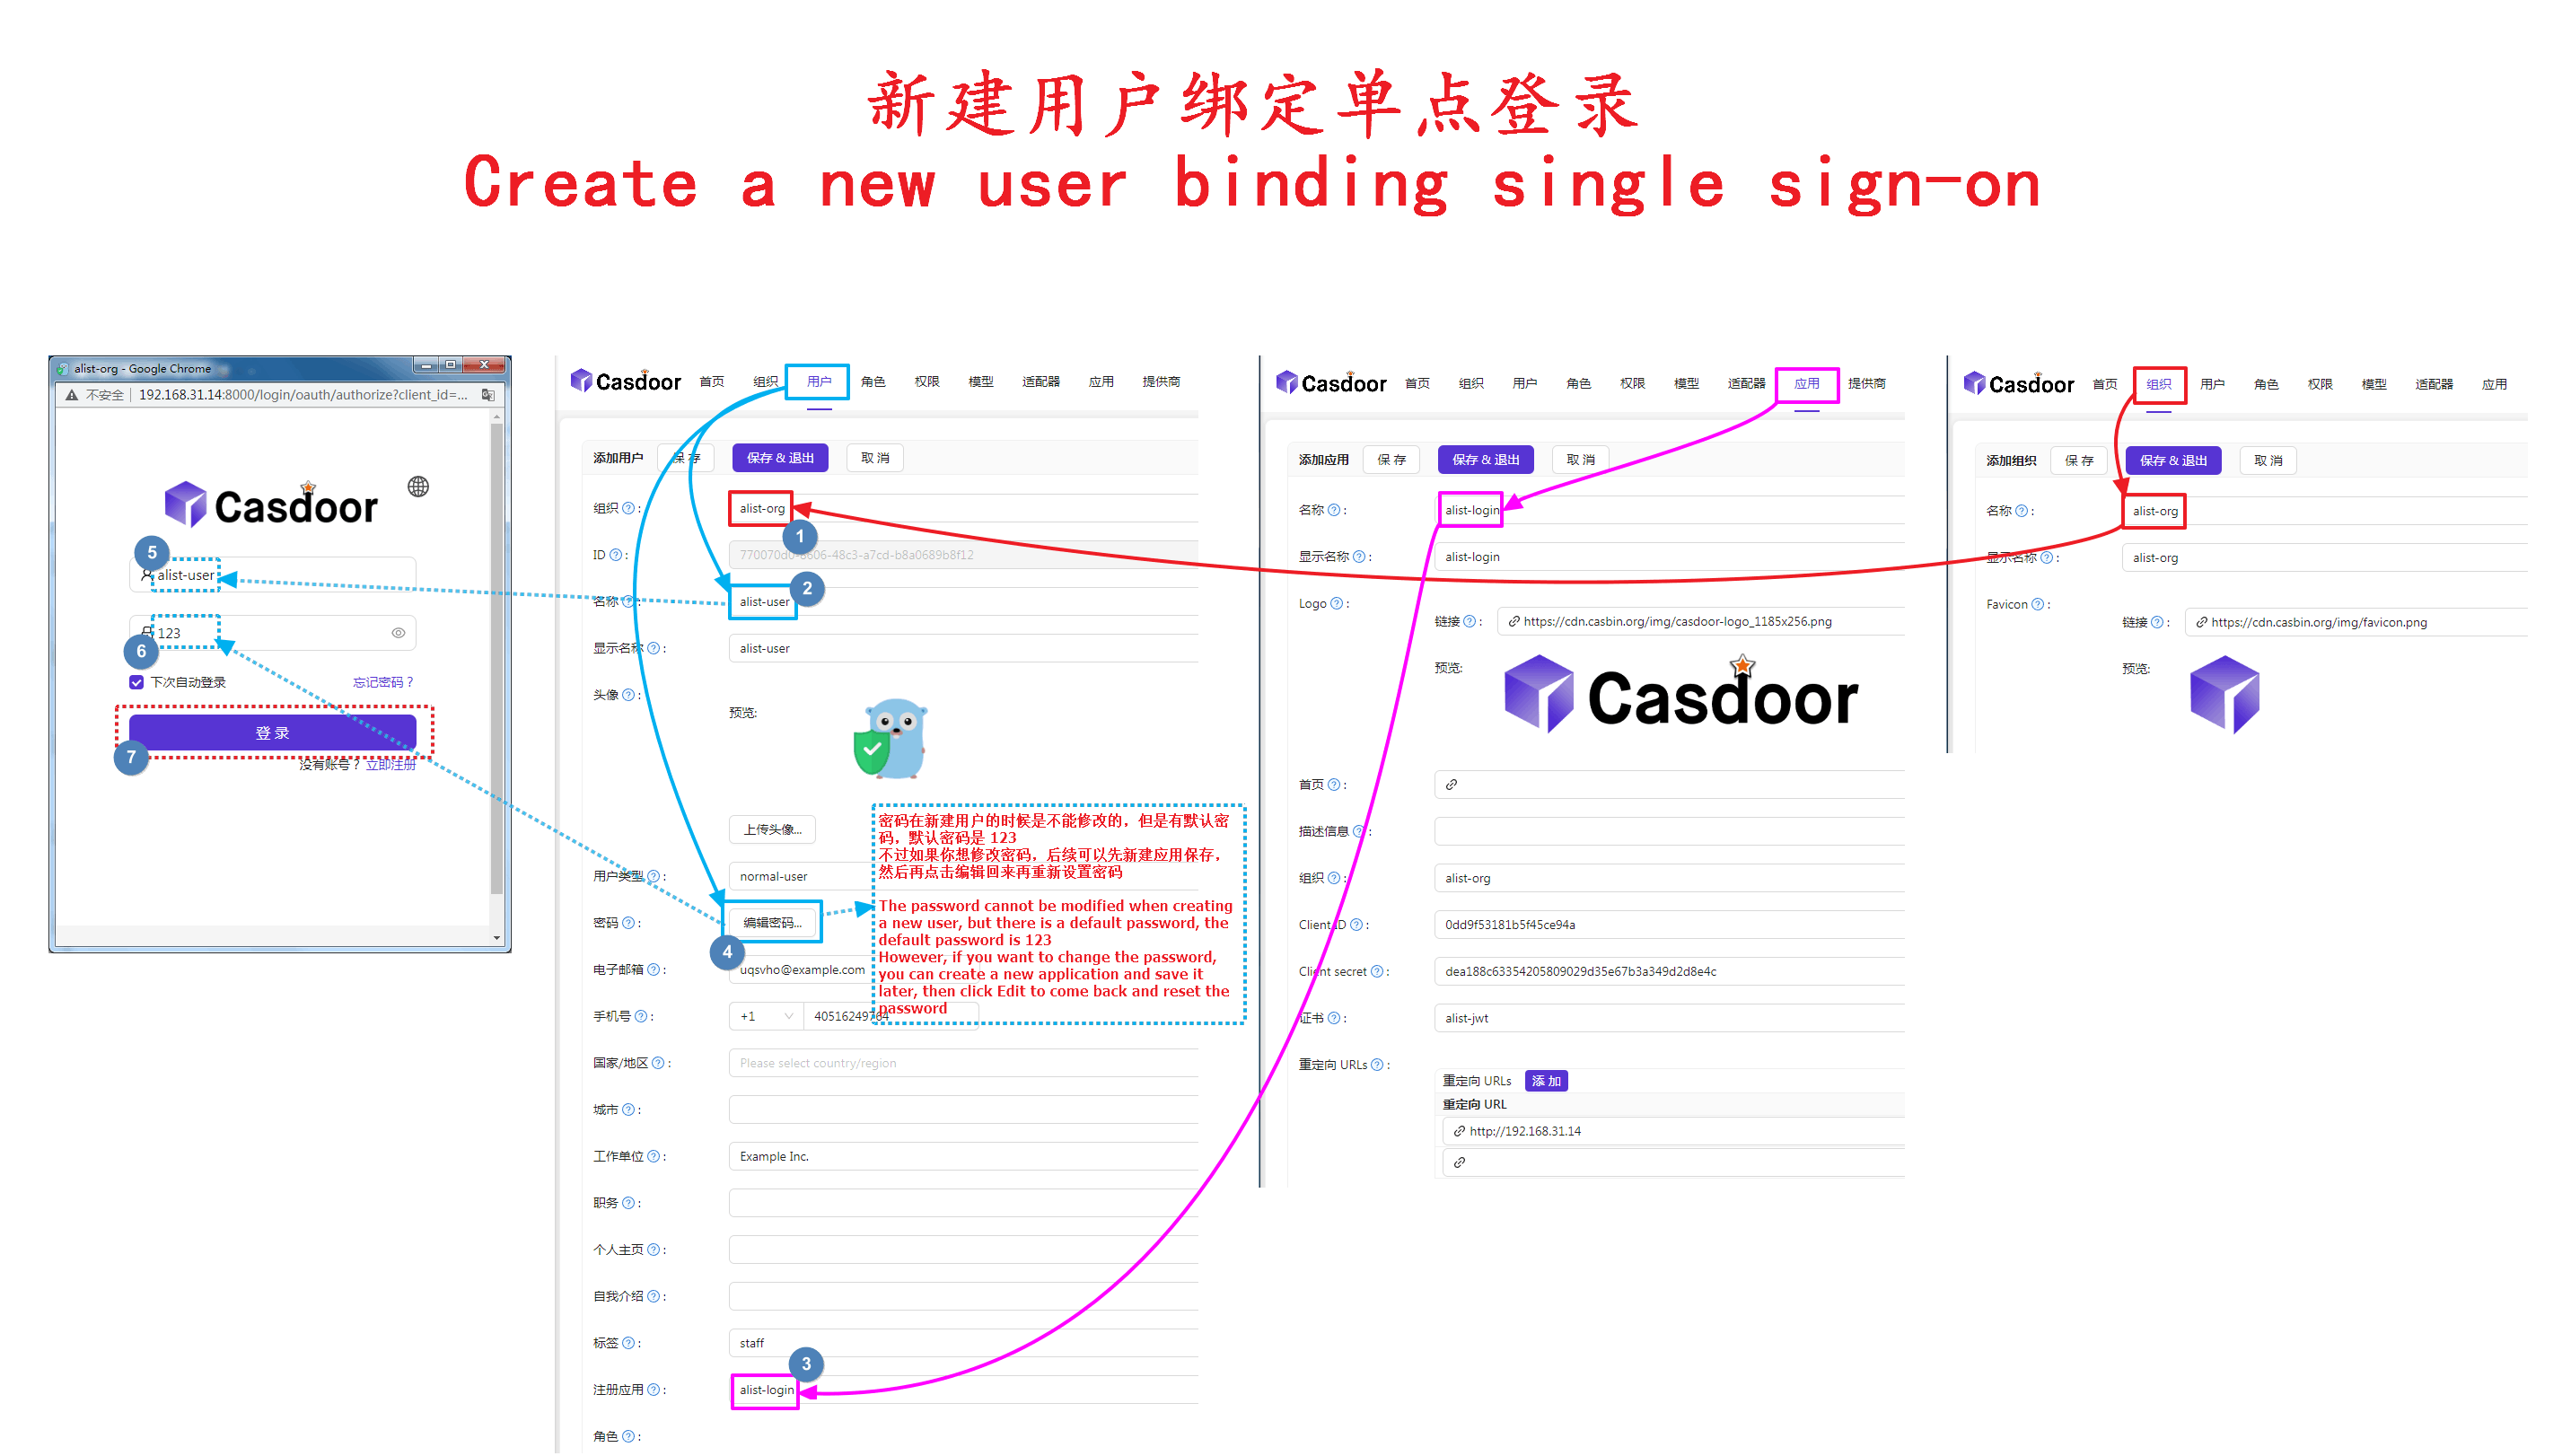
After we enter Casdoor, we first create Organization1, Token2, Application3, User4
Do not use the default organization (app-built-in) directly, because all users in this organization are global administrator accounts
Then fill in the AList backstage single sign-on option one by one. The user’s parameters are ignored for the time being. They are filled in when the personal data is bound to the single sign-on.
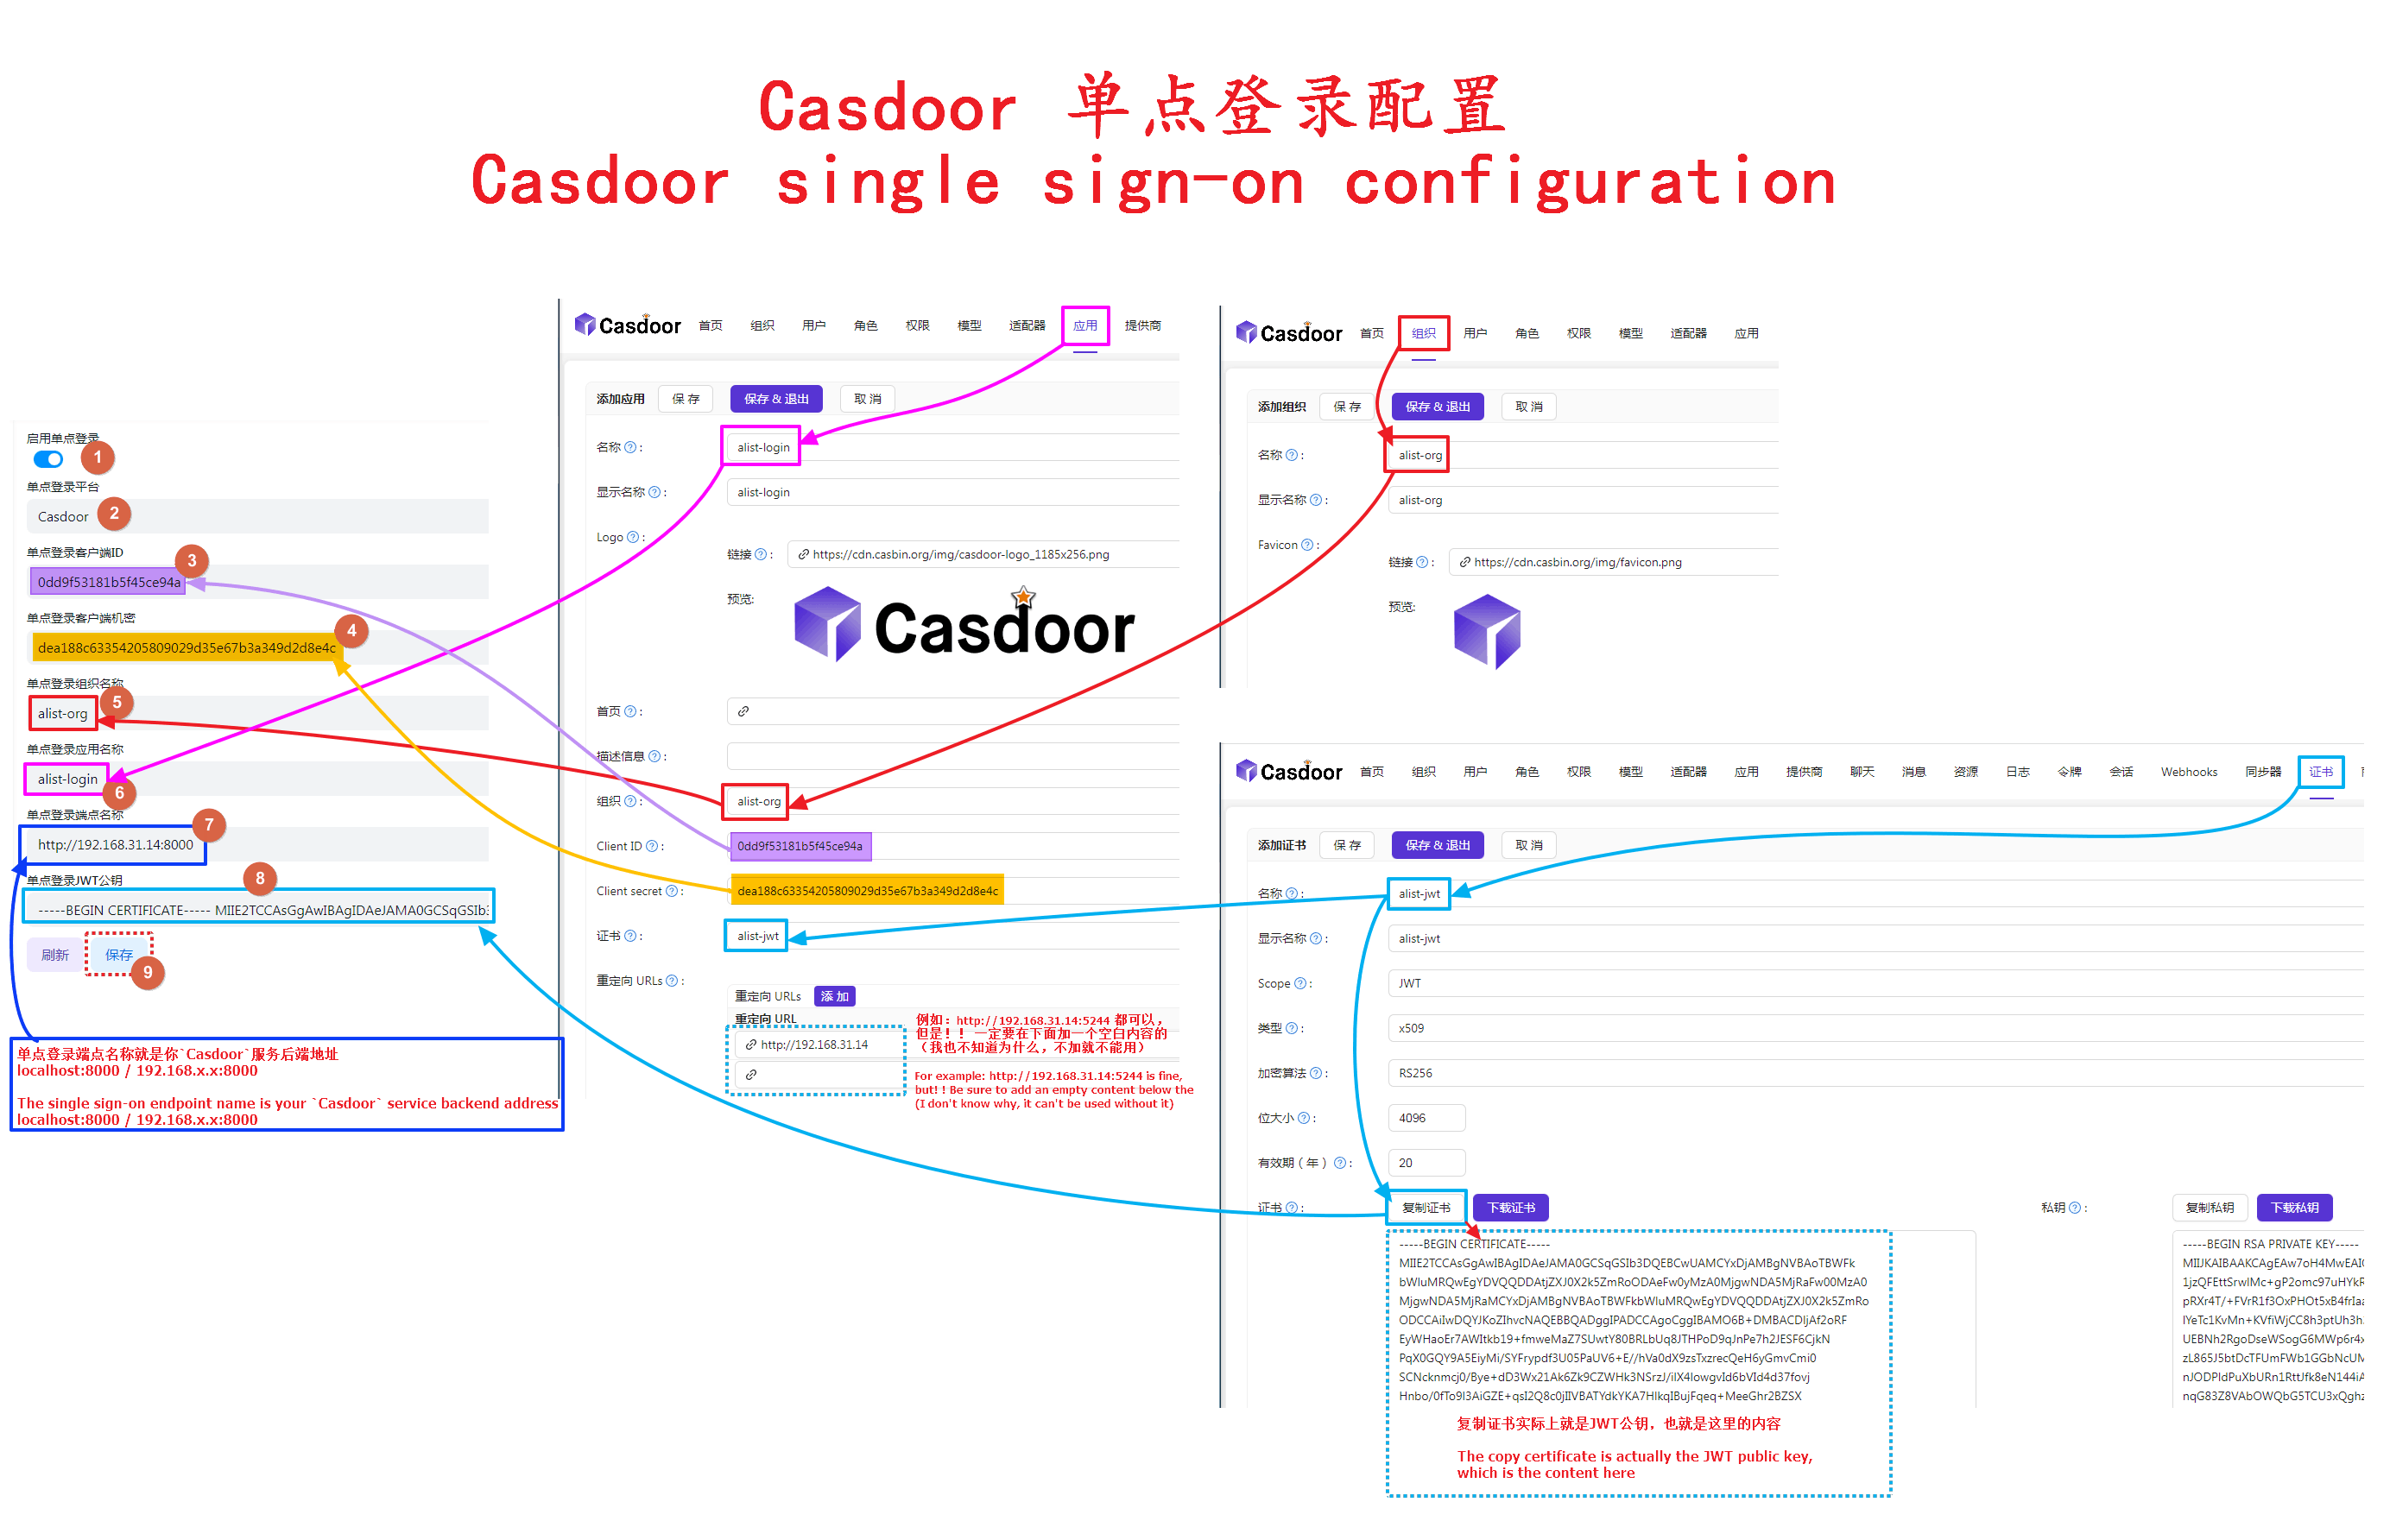
After filling in the above parameters, we come to the personal data and click Bind point single sign-on platform to bind
Then the Casdoor window will pop up, we can enter our registered user name
Access some other vendors on Casdoor
In addition to the four that AList has already connected to GitHub Dingding Google Microsoft, it is also connected to QQ Baidu Feishu WeChat/Enterprise WeChat Douyin Bilibili and so on, all click Check out all the manufacturers that can be accessed here, of course, the four that AList has already accessed can also be added to Casdoor
View detailed tutorials on accessing other providers: click to view
Direct iframe viewing
Authentik Setup
Create a Provider for AList
- Menu -> Applications -> Providers -> Create
- Select
OAuth2/OpenID Providerand click next - Enter an application name, this guide assumes you will call the provider
AList - Select your authorization flow. The built-in
default-provider-authorization-implicit-consentis acceptable - Make note of the
Client IDandClient Secretfields as provided by Authentik - save these values for later - For Redirect UDIs/Origins, enter the following, replacing [your.alist.domain] with the FQDN for your AList installation:
https://your.alist.domain/api/auth/sso_callback\?method=sso_get_token
https://your.alist.domain/api/auth/sso_callback\?method=get_sso_id
Please note the \ character before ? as an escape character for the regex used for this URI is mandatory.
- Make note of the signing key selected as you will need it later. This guide assumes you will use the default
authentik Self-signed Certificate - Save the new provider
Create an Application for AList
- Menu -> Applications -> Application -> Create
- Enter an application name, recommended
AList - An application slug of
alistwill be automatically selected for you. This guide assumes you will keep this value - Select the provider by name you selected in Provider Setup step 3 -
AList - Save the new application
Retrieve the JWT certificate
- Menu -> System -> Certificates
- Select the
>next to theauthentik Self-signed Certificate. If you chose another certificate for the application, select that certificate instead - Click Download Certificate to get a copy of the public JWT key
AList Setup
- Sso login enabled:
yes - Sso login platform:
OIDC - Sso client id: [Client ID from Authentik]
- Sso client secret: [Client Secret from Authentik]
- Sso oidc username key:
preferred_username - Sso organization name:
user - Sso application name:
user - Sso endpoint name:
https://your.authentik.domain/application/o/alist/- Note: Replace [your.authentik.domain] with the FQDN for your Authentik installation. Mind the trailing
/at the end of the path. If you chose a different application slug in Authentik Application setup 3, substitute that here
- Note: Replace [your.authentik.domain] with the FQDN for your Authentik installation. Mind the trailing
- Sso jwt public key: Open the certificate file downloaded in step 3.3 of the Authentik Application setup and paste the contents here. It will start with
-----BEGIN CERTIFICATE----- - Sso compatability mode:
no
SSO automatically registers as an AList account
- AList Version > v3.22.1 New Features
Before using single sign-on to register as an AList account, we need to bind the single sign-on of AList first, the binding method is explained above
Supports the
fivesingle sign-on methods mentioned aboveDo not use the default organization (app-built-in) directly, because all users in this organization are global administrator accounts
Except
CASDOOR, you only need to fill in theClient idand theClient secretsand the newly added single login account registered as Alist account configuration
SSO Full Fill Demo
Please refer to the detailed description below for how to fill in, the schematic diagram is just a reference for filling in and not suitable for everyone’s user habits
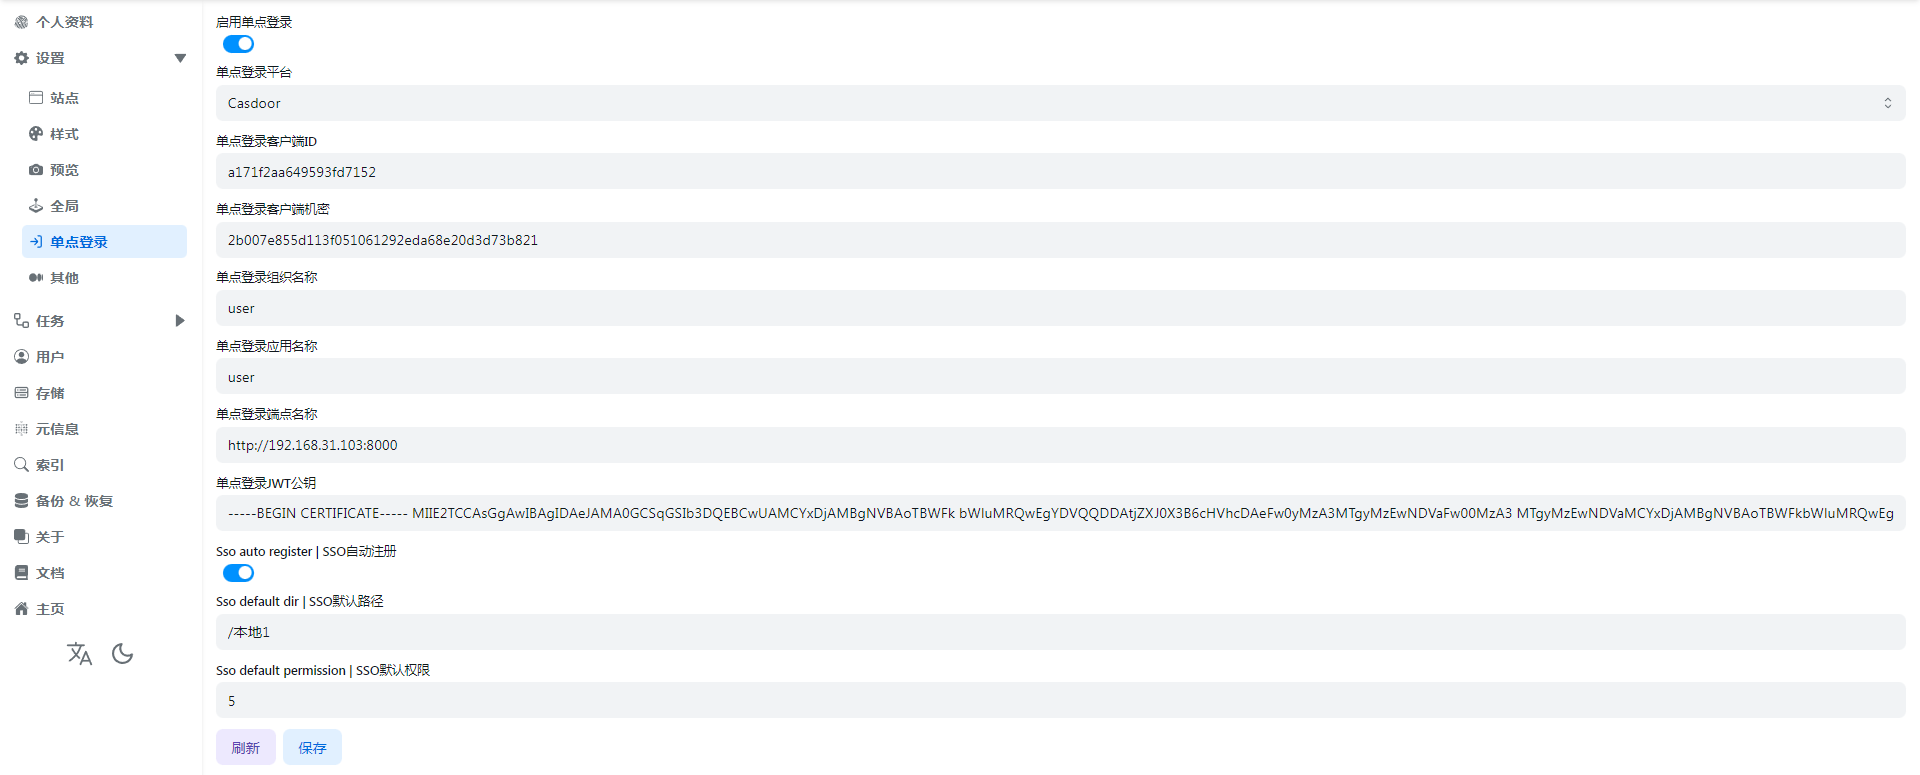
SSO auto register
If we want SSO single sign-on to be registered as an AList account, we need to enable this option before it can be used
SSO default dir
That is to say, the default path used by the registered account is equivalent to the Base path in the AList user settings.
It can be the root directory /, or the path /path/test/Demo specified by the user
SSO default permission
It is equivalent to which permissions are enabled by default for registered users, as shown below


The default is 0, no permission is enabled
If we need to enable some permissions during registration, we only need the sum of the numbers of different permissions
For example:
- We need to open the user's
WebDav readingandWebDav manageby default, that is 256+512=768, we just fill in768in the options - If we need to open the three permissions of
Make dir or upload,RenameandDeleteby default when registering, then it is 8+16+128=152, we can fill in152in the background
I won’t say much about the examples, just add the permissions you need
Precautions and instructions
4.1-There is already this user in the AList user database
| username | password | base_path | role | permission | opt_secret | github_id | disabled | sso_id |
|---|---|---|---|---|---|---|---|---|
| anyi | FzdDfkmU | /test1 | 0 | 3 | 0 | |||
| anyi_dc188911 | RUCtgqCw | /test1 | 0 | 3 | 0 | dc18891 |
As shown in the above table, a string of redundant ids is added after the newly registered single sign-on user name
This is because the same user already exists in the AList user database, so the sso_id is also added after the user name
If your newly registered single sign-on user name does not exist in the AList user database, it will not add the sso_id after the name
4.2-What should I do if I don’t want the SSO account to be registered as an AList account?
Just turn SSO auto register off,This will not affect the use of accounts that have been registered using Sso
4.3-If I turn off the single sign-on option, what should I do with the account registered with Sso?
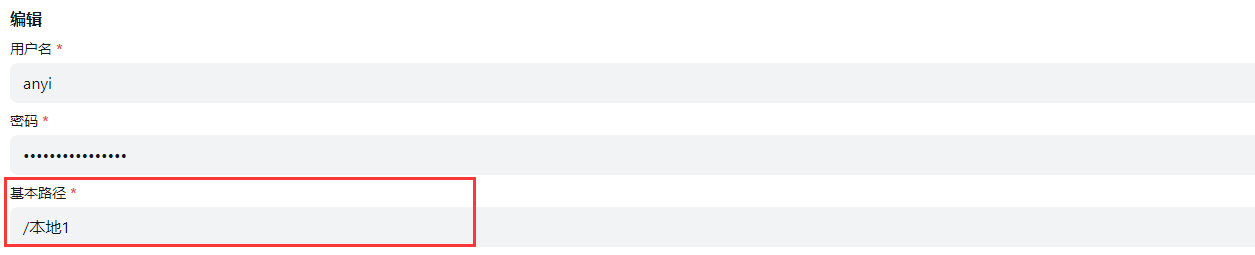
Don't worry, after using single sign-on to register and log in to AList, log in in the background, and find personal information after logging in
- You can modify
usernameandpasswordby yourself, save it after modification, so that you can log in with the AList account normally - At this time, you can click
Unbind Single Sign-On Platform, you can unbind or not unbind, and the subsequent default path and default permissions of this user can only be modified by the administrator in the AList background user
4.4-Why is this error code displayed when using sso?
{
    "code": 400,
    "message": "The single sign on platform is not bound to any users: record not found",
    "data": null
}
This is because Single Sign-On Automatic Registration is not enabled for the AList account, and the single sign-on cannot be registered as an AList account
- If you are an administrator, you can turn it on
- If you are a user, you can contact the administrator to enable
Sso compatibility mode
AList single -point login is bound to Dingtalk, and then opens Alist in the Dingtalk application, When you log in, choose Dingtalk login and jump to your computer browser. After authorization, you find that there is no response, because the browser cannot jump to the Dingtalk application inner browser page
At this time, you need to open the sso compatability mode again to click on the login to log in successfully
AList applied in Dingtalk and opened as shown in the figure:
How to create the application in Dingtalk workbench
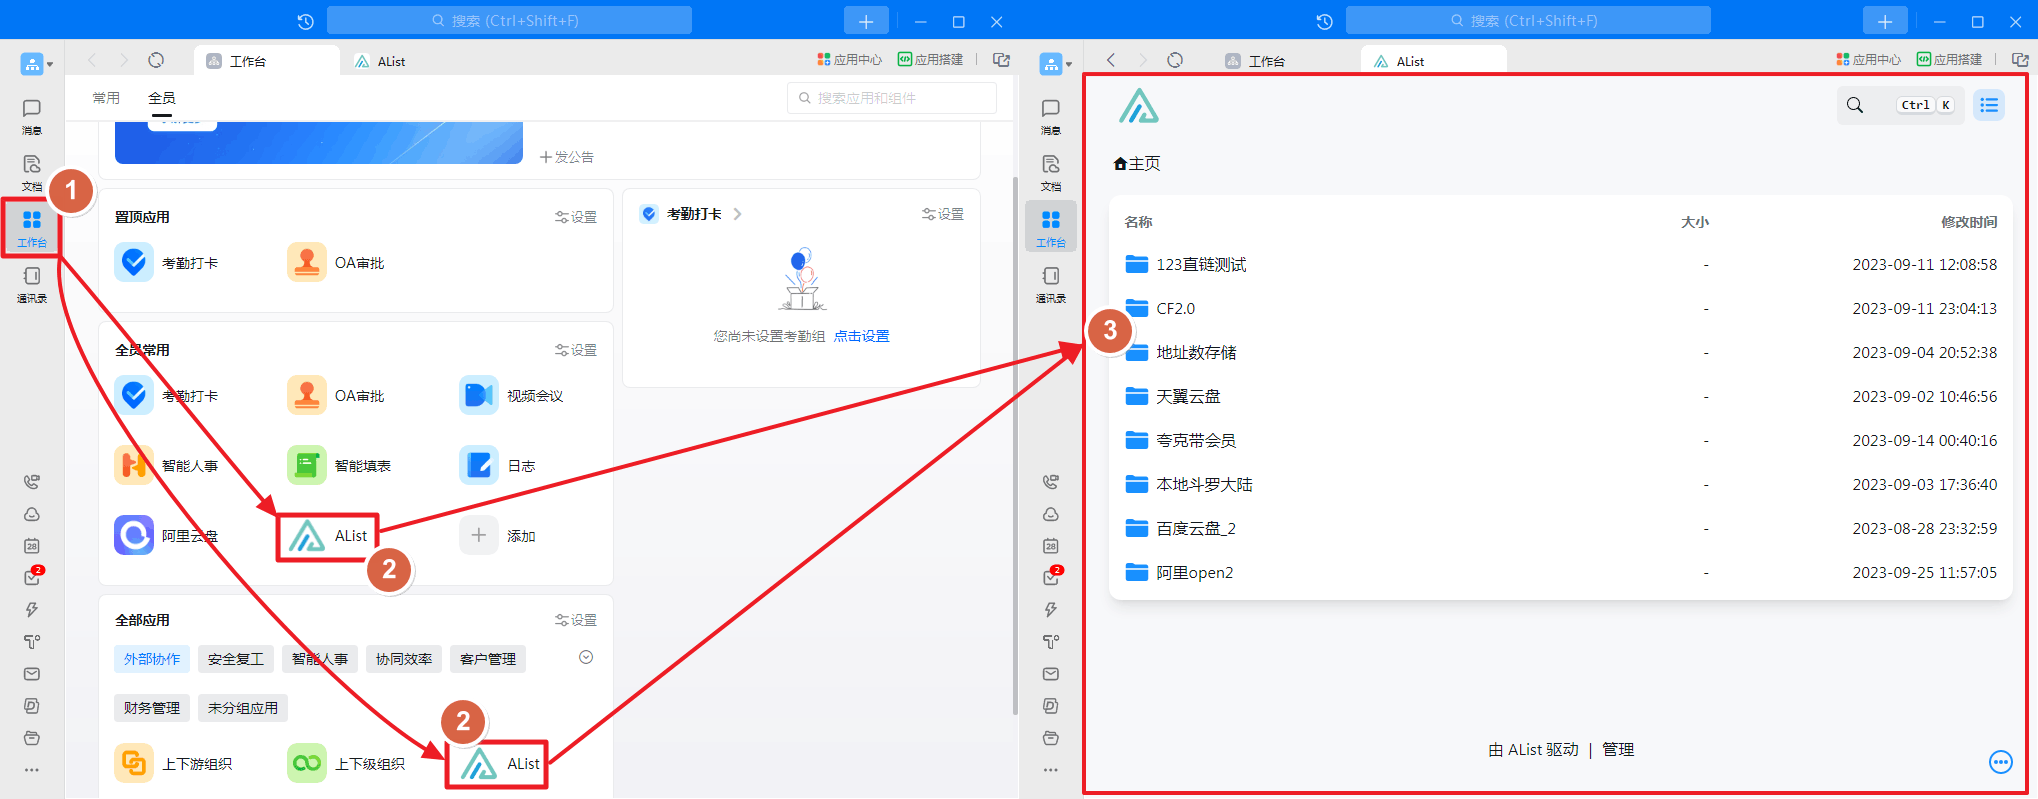
A picture teaches you to create a new application and add it
- LOGO is not modified when the newly -built newly built, you can wait for the newly built and then modify (See_Figure_2)
- If you just browse AList in the Dingtalk application, you do n’t need a single -point login management, you do n’t need to set up a single -point login configuration, you can just add an application
Modify the application logo
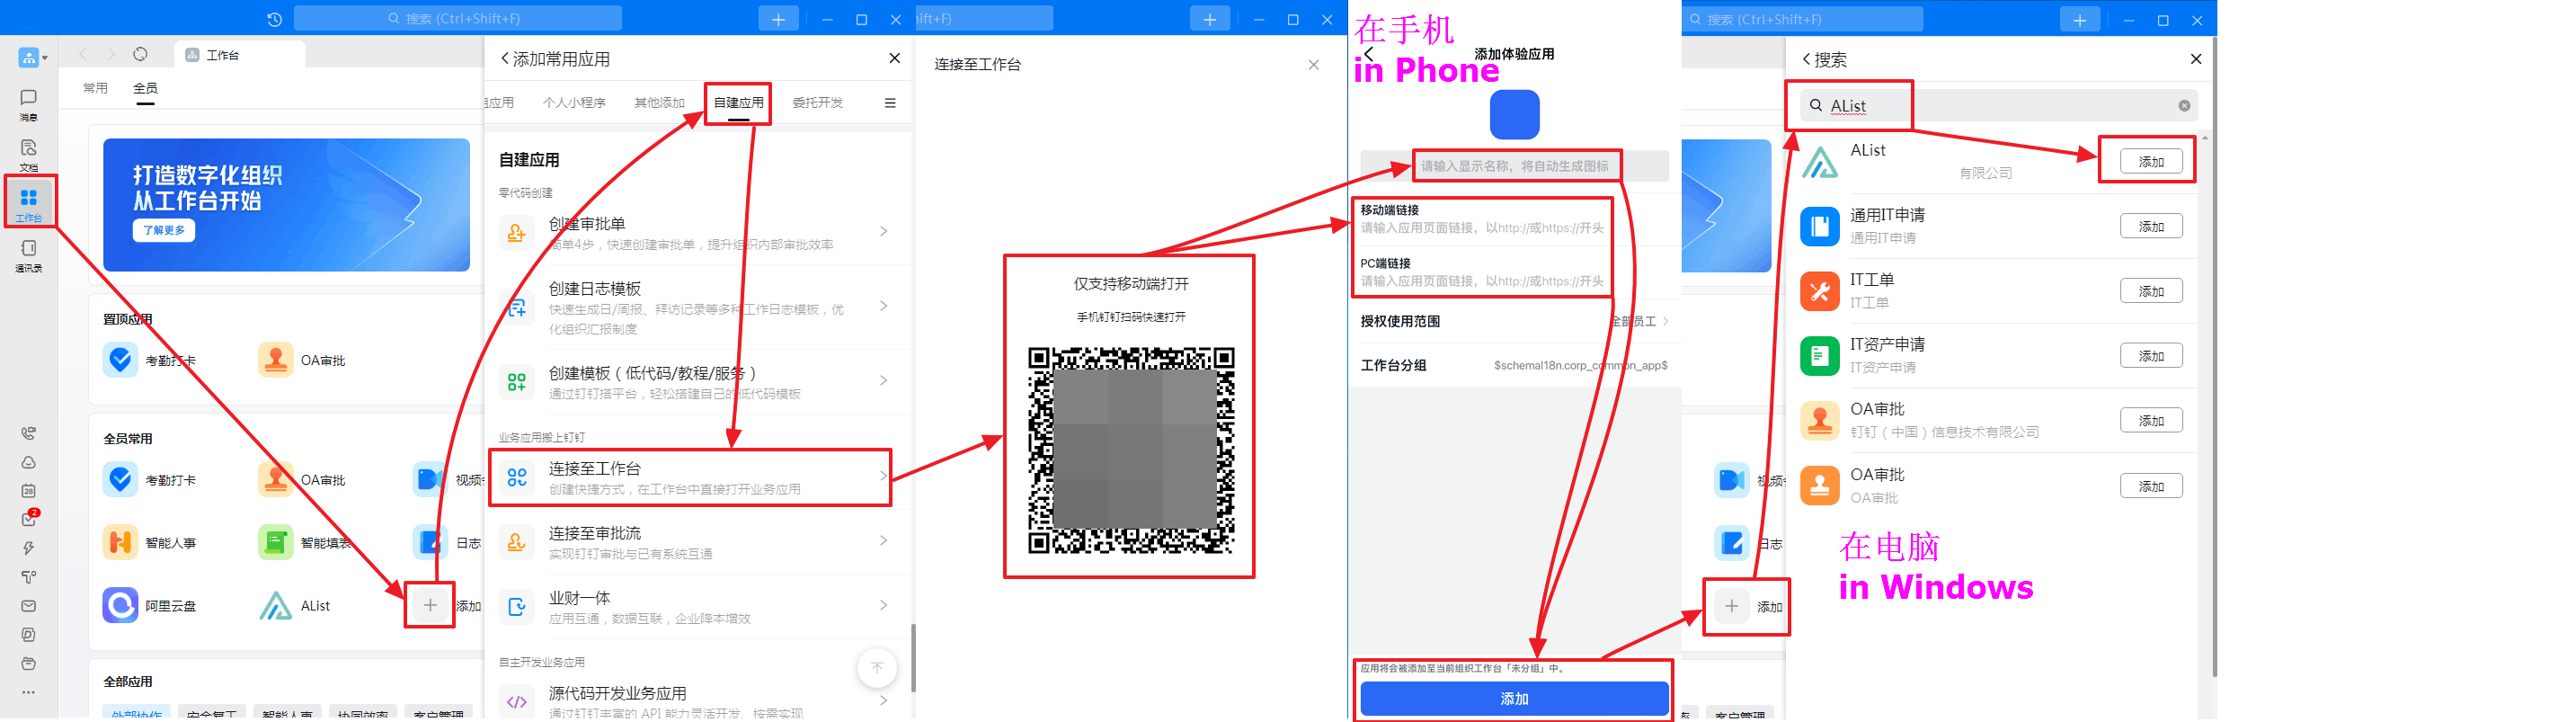
Open DingTalk open platform management Find your newly built app to modify the logo.
![]()
redirect url
After turning on Sso compatibility mode Then you need to log in to the corresponding software to modify the redirect url to change it to the two redirect url below
GitHubonly needs to add one:http(s)://You_Url/api/auth/sso_get_tokenMicrosoftandGoogleboth need to be added, you can add multiple Redirect urls, so you only need to add two Redirect URLs.
http(s)://You_Url/api/auth/get_sso_id
http(s)://You_Url/api/auth/sso_get_token
If you enable the Sso compatibility mode if you do not modify it, you will prompt Invalid Redirect URL Error