115 Cloud / Share
115 Cloud / Share
115 Cloud
Root folder ID
Open the official website of 115 Cloud and click the string behind the url when you click into the folder you want to set,
such as https://115.com/?cid=249163533602609229&offset=0&tab=&mode=wangpan,
which is 249163533602609229
Cookie acquisition method
The following message is displayed when mounting a 115 cloud. This is because 115 has removed the three client applications of Windows, Mac, and Linux.
{
"state": 0,
"error": "登录失败,系统已下架!如果你有电脑端的使用需求,我们诚挚邀请你下载体验115产品专属客户端“115浏览器”或在线使用“115网页端(115.com)”,畅享智能高效云生活。",
"errno": 0,
"message": "登录失败,系统已下架!如果你有电脑端的使用需求,我们诚挚邀请你下载体验115产品专属客户端“115浏览器”或在线使用“115网页端(115.com)”,畅享智能高效云生活。",
"code": 0
}
The cookies you have obtained from these three devices cannot be used. Please obtain the cookies from other devices again to mount them.
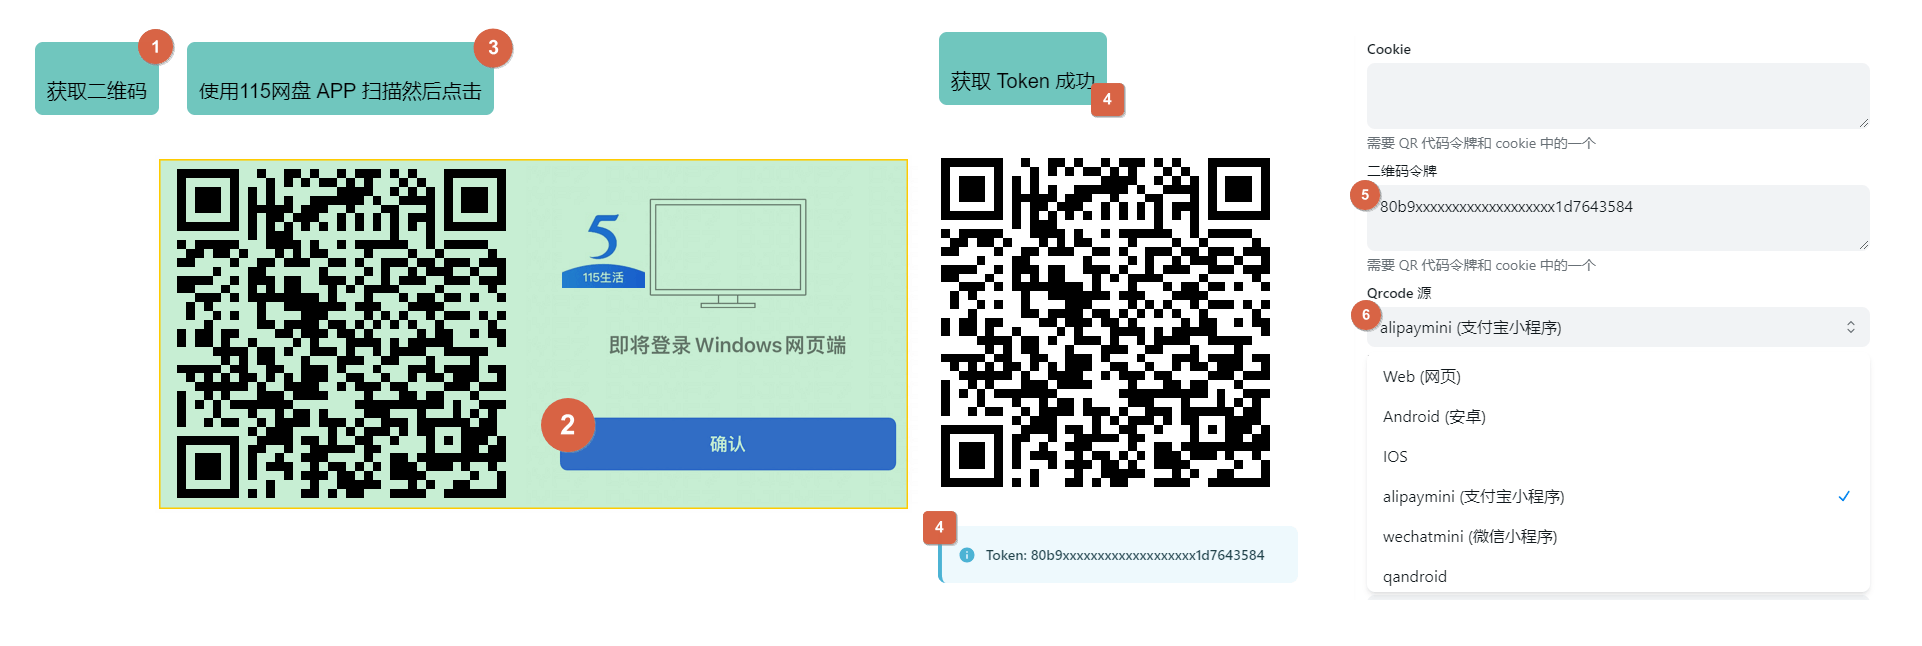
1. QRCode scanning method login
- Click Get QRCode,Then use the 115 mobile APP to scan the code
- After confirming the login by scanning the QR code using the APP,Click
Use 115 Cloud APP To Scan Then ClickButton, Get Token - You will get Token added to the
QRcode Tokenoption of the AList 115 Cloud, and then select theQrcode sourcedevice (leave the Cookie option blank)- Equipment to choose from:
Web、android、ios、tv、alipaymini、wechatmini、qandroid- It is not recommended to choose
WebandAndroid(ios), because after logging in with your commonly used device, the original login status will be kicked offline.
- It is not recommended to choose
- Equipment to choose from:
- Fill in the Token selection. After selecting the device and saving it, the Token will automatically obtain the Cookie of the corresponding device and fill it in automatically.
2. Log in by manually grabbing Cookies
The cookie is obtained from the request.
3. Get Cookies Using Python Script
Expand the detailed description to view the tutorial and script source code
Detailed description
View source
#!/usr/bin/env python3
# encoding: utf-8

"扫码获取 115 cookie"

__author__ = "ChenyangGao <https://chenyanggao.github.io>"
__version__ = (0, 0, 2)
__all__ = [
    "AppEnum", "get_qrcode_token", "get_qrcode_status", "post_qrcode_result",
    "get_qrcode", "login_with_qrcode",
]

if __name__ == "__main__":
    from argparse import ArgumentParser, RawTextHelpFormatter

    parser = ArgumentParser(description="""\
扫码获取 115 cookie

默认在命令行输出,需要安装 qrcode: pip install qrcode
    - https://pypi.org/project/qrcode/
可以指定 -o 或 --open-qrcode 直接打开图片扫码
""", formatter_class=RawTextHelpFormatter)
    parser.add_argument("app", nargs="?", choices=("web", "android", "ios", "linux", "mac", "windows", "tv", "alipaymini", "wechatmini", "qandroid"), default="web", help="选择一个 app 进行登录,注意:这会把已经登录的相同 app 踢下线")
    parser.add_argument("-o", "--open-qrcode", action="store_true", help="打开二维码图片,而不是在命令行输出")
    parser.add_argument("-v", "--version", action="store_true", help="输出版本号")
    args = parser.parse_args()
    if args.version:
        print(".".join(map(str, __version__)))
        raise SystemExit(0)

from enum import Enum
from json import loads
from urllib.parse import urlencode
from urllib.request import urlopen, Request


AppEnum = Enum("AppEnum", "web, android, ios, linux, mac, windows, tv, alipaymini, wechatmini, qandroid")


def get_enum_name(val, cls):
    if isinstance(val, cls):
        return val.name
    try:
        if isinstance(val, str):
            return cls[val].name
    except KeyError:
        pass
    return cls(val).name


def get_qrcode_token():
    """获取登录二维码,扫码可用
    GET https://qrcodeapi.115.com/api/1.0/web/1.0/token/
    :return: dict
    """
    api = "https://qrcodeapi.115.com/api/1.0/web/1.0/token/"
    return loads(urlopen(api).read())


def get_qrcode_status(payload):
    """获取二维码的状态(未扫描、已扫描、已登录、已取消、已过期等)
    GET https://qrcodeapi.115.com/get/status/
    :param payload: 请求的查询参数,取自 `login_qrcode_token` 接口响应,有 3 个
        - uid:  str
        - time: int
        - sign: str
    :return: dict
    """
    api = "https://qrcodeapi.115.com/get/status/?" + urlencode(payload)
    return loads(urlopen(api).read())


def post_qrcode_result(uid, app="web"):
    """获取扫码登录的结果,并且绑定设备,包含 cookie
    POST https://passportapi.115.com/app/1.0/{app}/1.0/login/qrcode/
    :param uid: 二维码的 uid,取自 `login_qrcode_token` 接口响应
    :param app: 扫码绑定的设备,可以是 int、str 或者 AppEnum
        app 目前发现的可用值:
            - 1,  "web",        AppEnum.web
            - 2,  "android",    AppEnum.android
            - 3,  "ios",        AppEnum.ios
            - 4,  "linux",      AppEnum.linux
            - 5,  "mac",        AppEnum.mac
            - 6,  "windows",    AppEnum.windows
            - 7,  "tv",         AppEnum.tv
            - 8,  "alipaymini", AppEnum.alipaymini
            - 9,  "wechatmini", AppEnum.wechatmini
            - 10, "qandroid",   AppEnum.qandroid
    :return: dict,包含 cookie
    """
    app = get_enum_name(app, AppEnum)
    payload = {"app": app, "account": uid}
    api = "https://passportapi.115.com/app/1.0/%s/1.0/login/qrcode/" % app
    return loads(urlopen(Request(api, data=urlencode(payload).encode("utf-8"), method="POST")).read())


def get_qrcode(uid):
    """获取二维码图片(注意不是链接)
    :return: 一个文件对象,可以读取
    """
    url = "https://qrcodeapi.115.com/api/1.0/mac/1.0/qrcode?uid=%s" % uid
    return urlopen(url)


def login_with_qrcode(app="web", scan_in_console=True):
    """用二维码登录
    :param app: 扫码绑定的设备,可以是 int、str 或者 AppEnum
        app 目前发现的可用值:
            - 1,  "web",        AppEnum.web
            - 2,  "android",    AppEnum.android
            - 3,  "ios",        AppEnum.ios
            - 4,  "linux",      AppEnum.linux
            - 5,  "mac",        AppEnum.mac
            - 6,  "windows",    AppEnum.windows
            - 7,  "tv",         AppEnum.tv
            - 8,  "alipaymini", AppEnum.alipaymini
            - 9,  "wechatmini", AppEnum.wechatmini
            - 10, "qandroid",   AppEnum.qandroid
    :return: dict,扫码登录结果
    """
    qrcode_token = get_qrcode_token()["data"]
    qrcode = qrcode_token.pop("qrcode")
    if scan_in_console:
        try:
            from qrcode import QRCode
        except ModuleNotFoundError:
            from sys import executable
            from subprocess import run
            run([executable, "-m", "pip", "install", "qrcode"], check=True)
            from qrcode import QRCode # type: ignore
        qr = QRCode(border=1)
        qr.add_data(qrcode)
        qr.print_ascii(tty=True)
    else:
        from atexit import register
        from os import remove
        from threading import Thread
        from tempfile import NamedTemporaryFile
        qrcode_image = get_qrcode(qrcode_token["uid"])
        with NamedTemporaryFile(suffix=".png", delete=False) as f:
            f.write(qrcode_image.read())
            f.flush()
        register(lambda: remove(f.name))
        def open_qrcode():
            platform = __import__("platform").system()
            if platform == "Windows":
                from os import startfile # type: ignore
                startfile(f.name)
            elif platform == "Darwin":
                from subprocess import run
                run(["open", f.name])
            else:
                from subprocess import run
                run(["xdg-open", f.name])
        Thread(target=open_qrcode).start()
    while True:
        try:
            resp = get_qrcode_status(qrcode_token)
        except TimeoutError:
            continue
        status = resp["data"].get("status")
        if status == 0:
            print("[status=0] qrcode: waiting")
        elif status == 1:
            print("[status=1] qrcode: scanned")
        elif status == 2:
            print("[status=2] qrcode: signed in")
            break
        elif status == -1:
            raise OSError("[status=-1] qrcode: expired")
        elif status == -2:
            raise OSError("[status=-2] qrcode: canceled")
        else:
            raise OSError("qrcode: aborted with %r" % resp)
    return post_qrcode_result(qrcode_token["uid"], app)


if __name__ == "__main__":
    resp = login_with_qrcode(args.app, scan_in_console=not args.open_qrcode)
    print()
    print("; ".join("%s=%s" % t for t in resp['data']['cookie'].items()))
Source code from:https://gist.github.com/ChenyangGao/d26a592a0aeb13465511c885d5c7ad61
You need to install Python 3.11.x or above
If the QR code cannot be displayed properly in the
CMDandpowershellterminals, you can use the-oparameter to generate an image to scan the code, or you need to install an additional terminalUse the
-oparameter to generate the image method and scan the QR code to confirmpython main.py wechatmini -o
The devices that can be obtained are as follows. If you do not fill in the device, the default device on the
Webside will be usedWeb,android,ios,linux,mac,windowstv,alipaymini,wechatmini,qandroidalipayminiandwechatminiThey are Alipay Mini Program and WeChat Mini Program.- Windows、Mac、Linux should not be able to use it anymore. The official client was recently removed from the shelves.
- It is recommended to use some devices that you do not commonly use, otherwise logging in will crowd out the previous ones.
Additional installation terminal
- Windows Store:https://apps.microsoft.com/detail/9n0dx20hk701?rtc=1&hl=zh-cn&gl=CN
- GitHub Download:https://github.com/microsoft/terminal/releases
Other ways, solve it yourself
Execute the command and obtain the QR code. Scan the QR code on the APP to obtain Cookie
PS C:\Users\233\Desktop\115> python --version
Python 3.12.2
PS C:\Users\233\Desktop\115> python main.py wechatmini
█▀▀▀▀▀▀▀█▀▀▀▀█▀███▀▀▀█▀█▀▀▀██▀█▀▀▀▀▀▀▀█
█ █▀▀▀█ █ █▀▄▀█▄▀▀█▀█  ▄█▀▀ █▀█ █▀▀▀█ █
█ █   █ █▀█  ▄ ▄▀▄ ▀ ▀▄ █▀▄▀█▀█ █   █ █
█ ▀▀▀▀▀ █▀█ ▄▀▄ ▄ ▄ █ ▄▀▄▀█▀█▀█ ▀▀▀▀▀ █
█▀██▀▀▀▀▀▀▀ ▄█ ▀█ █▀▀▀ █▀ ▄▄▄ ▀██▀█▀▀▀█
██▄▀▀▄▀▀▀▀ ▄██▀▄██▀██▄█ █▀▀▀ ▀▀▀▄▄▀ ▄▀█
█   ▀██▀████ ▀ ▀ ▀ █▀ ▀▀▄▄▀▄ █▄▀▄▄ ▀▀▀█
█ ▄▀▀█▄▀█▀▀██ ▀▀▀▀ ▄▀ ▀███▀██▀▄▀▀▄▄   █
██▄█ ▄▀▀█▄   ▀█▄▀▄▄ █ █▀ ▄▀▀  ▄▀█▀█▀█▀█
███▄ █ ▀ ▀█  █▄ ▀▀▀▀█▀█▀█ ▄▀▀ ▄ █  ██▄█
█ █▀▀▀█ █ ▄▄▀▄▄▀ █▄▄▀█▀ █▀▄█  ▀▀▀ ▀█▀ █
█ █   █ █▄ ▄▀ █▀▀ ▀▄▀▀█▀▀  █ █ ▄█▀▄▄ ▀█
█ ▀▀▀▀▀ █▀  █▄▀ ▀ ▄█▄ █▄▀▀█▄ ▀ ▀▄▄ ▄▄ █
▀▀▀▀▀▀▀▀▀▀▀▀▀▀▀▀▀▀▀▀▀▀▀▀▀▀▀▀▀▀▀▀▀▀▀▀▀▀▀
Execute the command directly. The QR code will appear in the terminal for display.
PS C:\Users\233\Desktop\115> python --version
Python 3.12.2
PS C:\Users\233\Desktop\115> python main.py wechatmini -o
After using the -o parameter, a QR code image will pop up automatically
Rapid upload
v.3.27.0 version Enhanced Rapid upload: You can directly upload files with
Alibaba Cloud Disk Openby copying- The premise is to upload the file from 115 Rapid upload to Alibaba Cloud Disk Open, the file already exists in Alibaba Cloud Disk Open, otherwise it is a normal copy task.
- If you want to transfer 115 cloud disk files to Alibaba Cloud Disk in seconds, you need to turn on the Rapid upload option of Alibaba Cloud Disk, otherwise it will be uploaded in normal mode.
If you want to upload files using Miaochuan, it is recommended to build an AList locally on your home computer and add a local storage and 115 cloud disk to copy Miaochuan to save resources.
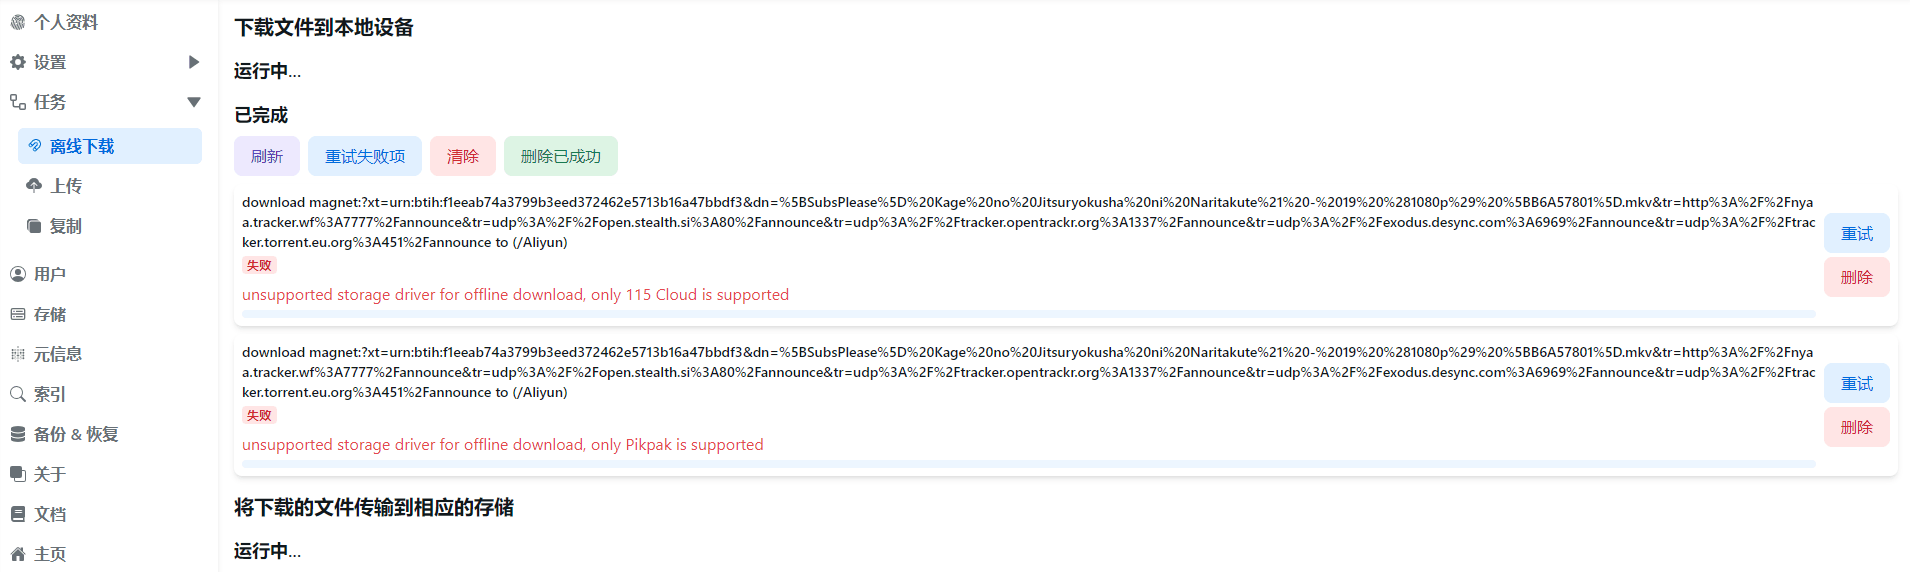
Offline Download
v3.37.0 and above versions support calling115 Cloud offline download function in AListSelect in the lower right corner and select 115 Cloud for offline download options
- Support:
magne,http,ed2klinks
Only 115 Cloud is supported for offline download. If it is not 115 Cloud, the following error message will be displayed, Although the offline download prompt was successfully added, an error will be prompted in the background.
- unsupported storage driver for offline download, only 115 Cloud is supported
- Some tips for using 115 offline downloads:
- Out of sync problems may occur (manual refresh in the lower right corner )
- Currently, when the download is successful, completed tasks in the offline list are deleted.
- 115 Task URLs that are already in the offline list cannot be added again.
The default download method used
115 Share

Sharing link ID1 and Sharing link extraction code2 How to obtain them respectively is clear at a glance.
Root folder ID
The default is empty and the entire directory file is mounted.
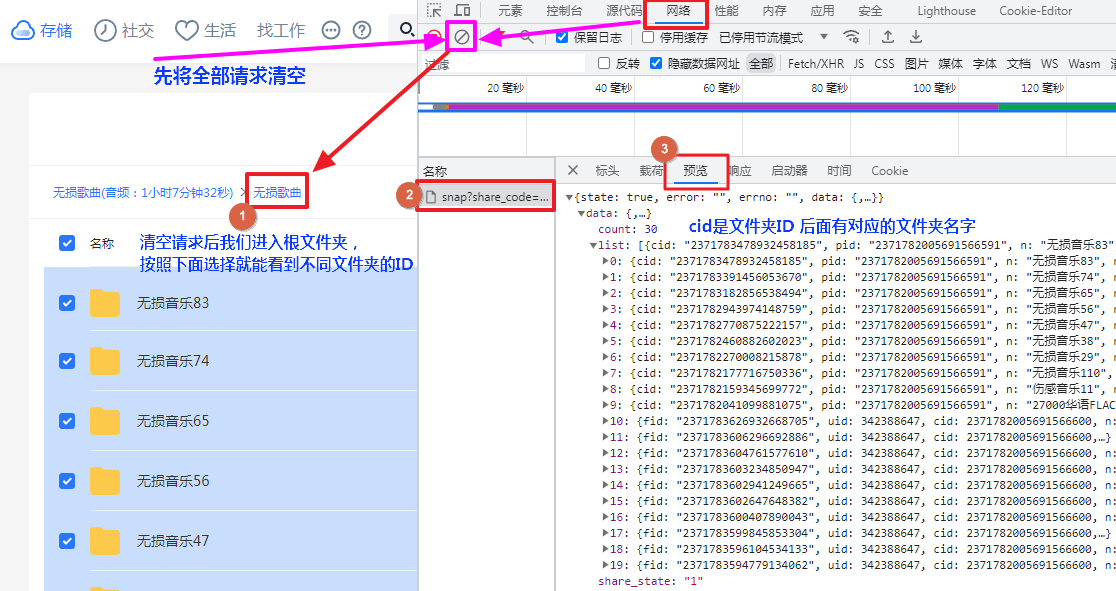
The folder IDs are the root folder ID and the subfolder ID respectively. The following demonstrates how to obtain the shared root folder directory ID1 and other subfolder directory ID2 respectively.
Open developer mode (F12) and clear all requests first. Before we enter the folder, clear all requests first.
Let's click on the root folder to enter. There will be a new request on the right, and then select Load to see the ID (cid) of our folder.
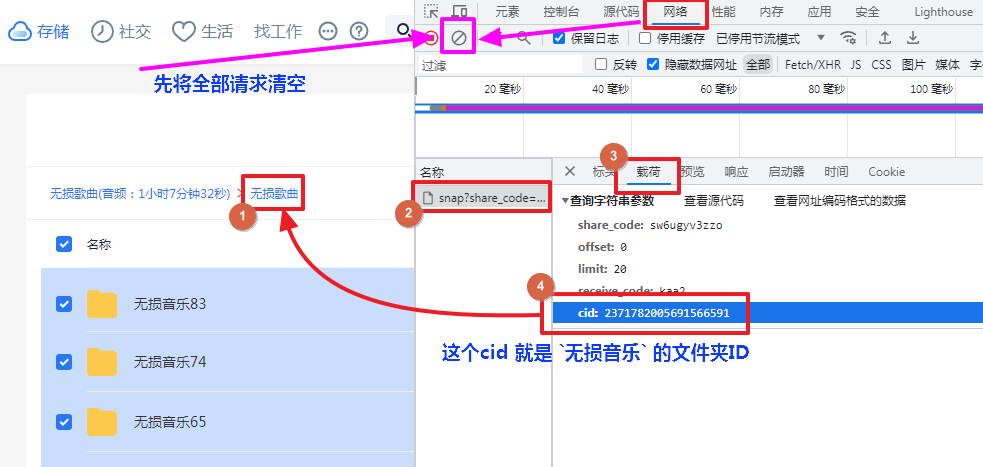
Open developer mode (F12) and clear all requests first. Before we enter the folder, clear all requests first.
There will be a new request on the right, then select Preview and expand it to see the IDs (cid) of other subfolders.
Error Tips
For example, the 115 sharing link shown in the picture below has expired, but the sharing link can still be opened.
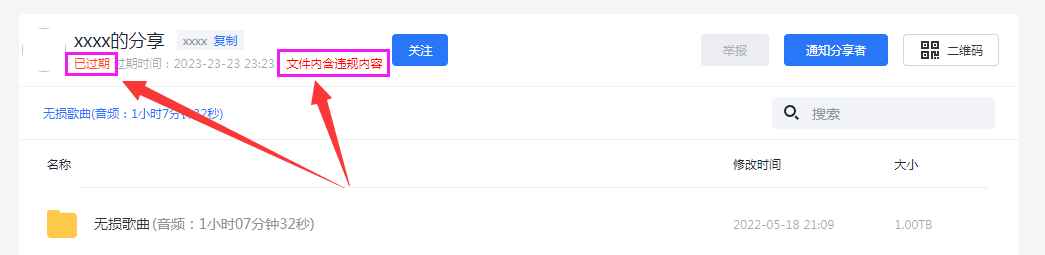
But when adding and saving, the following error code will appear:
Failed init storage but storage is already created: failed init storage: failed to get share snap: json: cannot unmarshal number into Go struct field .data.shareinfo.share_state of type string